

Lady Falcon Travelers
Painted Traveler's Notebooks...
Á while back I discovered you can paint Leather Travelers Notebooks with acrylic paint, my all time favorite medium. Regular Acrylic paint will work, however special acrylics for leather are better and give a much nicer result.
Since then I have made quite a few Traveler's notebooks that were painted, among which are my painted lady and some nebula's. I tend to show some of the TN's I make in my facebook group, Lady Falcon Traveler's Notebooks and on my instagram, @LadyFalconTN, but somehow seem to forget to post them here...
So without further ado, here's my latest Weir Tree TN. It's an A6 Traveler's Notebook and it has one, larger/older , brother, or sister, in the world =)
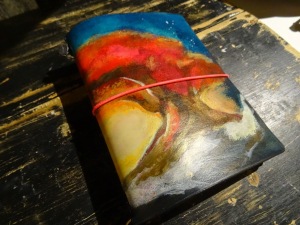
These are hand painted and since the leather doesn't take kindly to pencil, I can't sketch it out before hand.
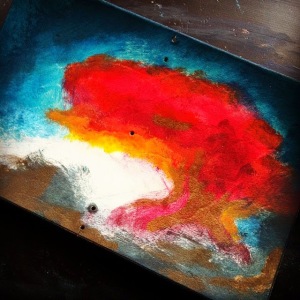
As you can see in the next picture, it's a rough sketch with paint, after which the rest gets painted, slowly building layer after layer.
I love working like this,
Feeling my way to the final stage.
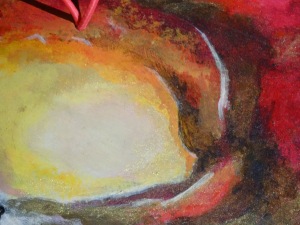
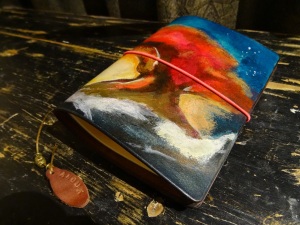
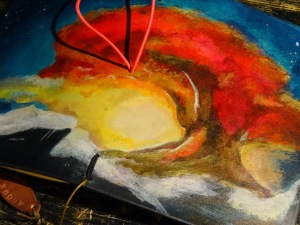
Trying to capture the light and how it bounces off the tree.

The stars in the sky are an extra challenge =) and usually leave me all starry looking as well.

Here it is next to my own A6 Traveler's Notebook.
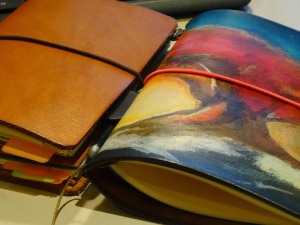
And the insert I made to go with it.
I always leave the inside with just the leather dye/stain, because this way I can brush the inside to make it nice and soft and suede like.

Positively pettable =)

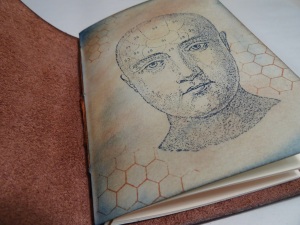
The last few pics are from the previous Weir Tree, which is an XL Regular Size, a bit larger.
I would love to see both next to each other someday =)
I hope you enjoyed watching this and I wish you a wonderful weekend.
xx Monique
IG: LadyFalconTN
Flickr: Traveler's Notebooks
Etsy: MorganLeFaesTrinkets
Facebook:
Lady Falcon Traveler's Notebooks
Morgan Le Fae's Trinkets
Since then I have made quite a few Traveler's notebooks that were painted, among which are my painted lady and some nebula's. I tend to show some of the TN's I make in my facebook group, Lady Falcon Traveler's Notebooks and on my instagram, @LadyFalconTN, but somehow seem to forget to post them here...
So without further ado, here's my latest Weir Tree TN. It's an A6 Traveler's Notebook and it has one, larger/older , brother, or sister, in the world =)

These are hand painted and since the leather doesn't take kindly to pencil, I can't sketch it out before hand.

As you can see in the next picture, it's a rough sketch with paint, after which the rest gets painted, slowly building layer after layer.

I love working like this,

Feeling my way to the final stage.

Trying to capture the light and how it bounces off the tree.

The stars in the sky are an extra challenge =) and usually leave me all starry looking as well.

Here it is next to my own A6 Traveler's Notebook.

And the insert I made to go with it.

I always leave the inside with just the leather dye/stain, because this way I can brush the inside to make it nice and soft and suede like.

Positively pettable =)

The last few pics are from the previous Weir Tree, which is an XL Regular Size, a bit larger.
I would love to see both next to each other someday =)
I hope you enjoyed watching this and I wish you a wonderful weekend.
xx Monique
IG: LadyFalconTN
Flickr: Traveler's Notebooks
Etsy: MorganLeFaesTrinkets
Facebook:
Lady Falcon Traveler's Notebooks
Morgan Le Fae's Trinkets
Double threading elastic for your Traveler's Notebook
Since I started making Traveler's Notebooks I have tried out several different ways to thread the elastic through the spine to keep the notebooks inside.
Obviously I started with the normal method, which is one thread, this is realy plenty to keep the notebooks in place.

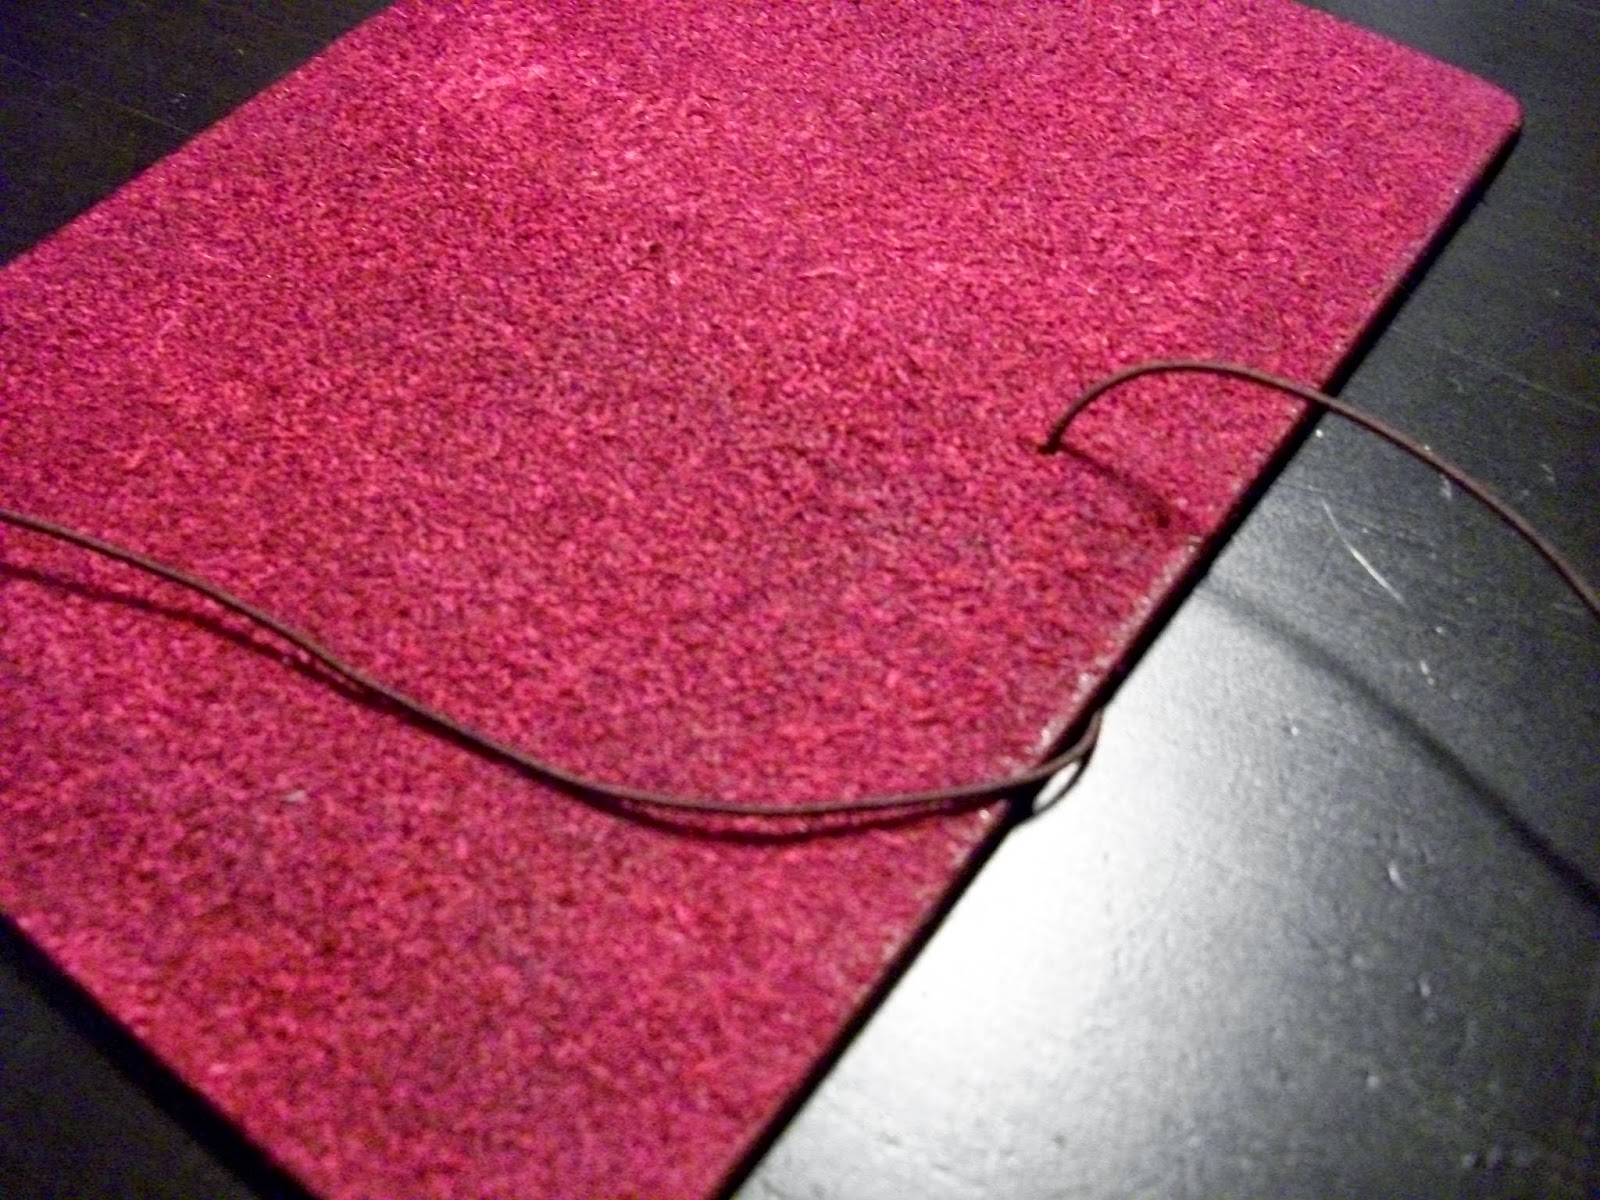
You start with keeping a length of elastic on the side, long enough to go from the bottom to the top.

Thread the rest through the second hole from the back to the front and up through the next hole, back to the outside.

Go over the top and pull the elastic into the slit at the top. Come all the way down and pull it through the slit on de bottom, to the back.
If your's doesn't have a slit, you'll have to thread it through the holes, from the outside to the inside at the top hole and the reverse at the bottom hole.
Now you flip it over to put the elastic through the second hole from the bottom. To aid me in pulling the elastic through the hole I use a wire folded in half, kinda like a hair pin.

As you can see, it goes through the same hole we started with, the loose end is still there.

From the inside it looks like this after you've pulled it through. Next step is to pull it through the second hole from the top, not the far top hole. From the inside to the outside.

Now all you have to do is to pull the loose elastic, which we left at the beginning, up through the bottom hole slit, up and around to the back, through the top hole slit.
In case you don't use the tin clasp, you can just pull the top elastic to the inside and the bottom one as well. You can then tie a knot in them on the inside and be done. You'll also have to tie your waxed cord for the bookmark to one of the elastics.

At the top on the outside you now have two bits of elastic. You can put each elastic through one of the holes on the underside of the tin clasp (there are 2 on the underside and 1 at the top).
Take the waxed cord and pull through the hole next to the top elastic, using the same folded wire (or anything else that's strong enough)

You now have something that looks like this.
Take the top elastic and the waxed cord in one hand, the bottom elastic in the other and tie a knot.


When the knot is sunken well into the clasp, close the clasp by either tapping it with a hammer, or squeeze it with pliers, like I ususaly do.
I use a little scrap piece of leather to keep the clasp from getting scarred by the pliers. You don't need to do that, I just prefer it this way. It not only protects the clasp, but also the leather from getting scratched by the tools. Which is another reason why I prefer not to use a hammer.
This piece of leather will last you a long time. It has been my aid since I first started using the tin clasps almost a year ago now. Closing the clasp doesn't need a lot of pressure, but be sure to squeeze it nice and tight.

You can now cut the bits sticking out, right next to the clasp. Pull the waxed cord to the front, if you haven't already and cut it to size. Don't cut it too short, because you may want to tie some dangly things from it =)
All you need now is an elastic to keep your Traveler's notebook closed and you're good to go...well and some inserts of course...

I hope this has been helpful. Should you have any questions about any of this, please don't hesitate to ask.
I wish you a wonderful weekend.
Obviously I started with the normal method, which is one thread, this is realy plenty to keep the notebooks in place.
However I got so many requests to put two elastics in the spine, that I started trying out different ways to thread the elastic. I looked around for ways other people were threading their Traveler's Notebooks and found several, but none of them really appealed to me.
The first and easiest way I found would be the sideways threading, as opposed to the regular vertical threading. This seems very nice in the beginning, but has a tendency to deform the spine, so that wasn't going to work for me.
I also like to use the little tin clasp, since it performs two functions. It not only keeps the elastic for the spine, but it also holds the bookmark, keeping the amount of knots needed to attach everything to a minimum.
Threading two elastics and the bookmark through the little tin clasp is a challenge, since it is so small. You'd have to fiddle it through, tie a knot and then squeeze it closed. Plus I had a terrible time keeping the elstics nicely lined up, major OCD kicking in...yeah, that didn't work out too great. At least not the way I like it.
So I came up with an alternative threading, where I thread one long elastic through the spine twice, attach the waxed cord for the bookmark, keep everything lined up nicely and still easily use the tin claps to secure it all.
You start with keeping a length of elastic on the side, long enough to go from the bottom to the top.
Thread the rest through the second hole from the back to the front and up through the next hole, back to the outside.
Go over the top and pull the elastic into the slit at the top. Come all the way down and pull it through the slit on de bottom, to the back.
If your's doesn't have a slit, you'll have to thread it through the holes, from the outside to the inside at the top hole and the reverse at the bottom hole.
Now you flip it over to put the elastic through the second hole from the bottom. To aid me in pulling the elastic through the hole I use a wire folded in half, kinda like a hair pin.
As you can see, it goes through the same hole we started with, the loose end is still there.
From the inside it looks like this after you've pulled it through. Next step is to pull it through the second hole from the top, not the far top hole. From the inside to the outside.
Now all you have to do is to pull the loose elastic, which we left at the beginning, up through the bottom hole slit, up and around to the back, through the top hole slit.
In case you don't use the tin clasp, you can just pull the top elastic to the inside and the bottom one as well. You can then tie a knot in them on the inside and be done. You'll also have to tie your waxed cord for the bookmark to one of the elastics.
At the top on the outside you now have two bits of elastic. You can put each elastic through one of the holes on the underside of the tin clasp (there are 2 on the underside and 1 at the top).
Take the waxed cord and pull through the hole next to the top elastic, using the same folded wire (or anything else that's strong enough)
You now have something that looks like this.
Take the top elastic and the waxed cord in one hand, the bottom elastic in the other and tie a knot.
Nice and tight,... but not too tight. You want the elastics to be firm enough to hold your booklets, but not so firm that they will tear your booklets.
The waxed cord sticking out is probably too long at this point and since we don't want to waste any, you pull it as short as you can. By doing this, usualy, the little knot disappears into the tin clasp. If it doesn't, pull the elastics on the inside to get the knot safely lodged inside the tin clasp. Remember to pull them all together.
When the knot is sunken well into the clasp, close the clasp by either tapping it with a hammer, or squeeze it with pliers, like I ususaly do.
I use a little scrap piece of leather to keep the clasp from getting scarred by the pliers. You don't need to do that, I just prefer it this way. It not only protects the clasp, but also the leather from getting scratched by the tools. Which is another reason why I prefer not to use a hammer.
This piece of leather will last you a long time. It has been my aid since I first started using the tin clasps almost a year ago now. Closing the clasp doesn't need a lot of pressure, but be sure to squeeze it nice and tight.
You can now cut the bits sticking out, right next to the clasp. Pull the waxed cord to the front, if you haven't already and cut it to size. Don't cut it too short, because you may want to tie some dangly things from it =)
All you need now is an elastic to keep your Traveler's notebook closed and you're good to go...well and some inserts of course...
I hope this has been helpful. Should you have any questions about any of this, please don't hesitate to ask.
I wish you a wonderful weekend.
How I'm using my Traveler's Notebooks at the moment
A year has passed since I made my first leather Traveler's Notebook and I've been using this sytem now for well over a year.
I've been making my own diaries and inserts right from the start and have adapted the system to suit my needs. I've used several different lay-outs and setups through-out this period, but I think I have now found a setup that works exactly how I like it.

I have 4 RS TN's for different purposes, one for work, one for art journaling, one for my Etsy store and one personal journal and diary/agenda. I also have a Fieldnotes sized TN for lists and keeping track of online orders and a small Passport sized one that I use as a wallet.
At first I used a setup with a MOTP, a WOTP and a daily diary with a chronodex adaptation to fit a 24 hr day. As time progressed and I was slowly overcoming the symptoms of my burn-out, I found I didn't need a full daily page to keep track of what I was doing. I did however want to keep at least a page per week.
___Warning, picture heavy post___
I didn't like how everything was in seperate booklets and wanted to contain it all into one. So I designed a diary that would do all that, the MOTP, the weekly and a page per week for tasks and stuff.

This month I tried this setup out after having tested it for my work diary.

Here's the MOTP, which is followed by the weekly pages.
I felt the boxes were to dark, so for the new template I made the boxes thinner/lighter...but I'll have to wait till the new year comes around to use the new template...no sense wasting a perfectly good diary, right?

The first week I kept fairly simpel. Used a fountain pen with pink ink, bought originally for my daughter, but I think I'm going to keep it =)

Now I'm pretty sure these pictures are not very interesting for anyone who isn't interrested in diaries and planning and such.

Still, I thought I'd add them, just to give the complete picture ;-)

And who knows you might like this setup, in which case these pictures may give you an impression about how this can be used.

Now we've come to the next month and a few things are already entered in there, among other things, my 22nd wedding anniversary ;-)

As you can see, the monthly pages go before the weekly.
To keep the weeks from splitting I decided to place the monthly pages in front of the week where the thursday was in the new month. Like the way we decide wether the first day of the new year is also in the first week of the new year...

When I feel I don't have enough space or, like in this case, I want something I can move to another page/week, I use tip-ins with washi.
At the end of the booklet I pasted a list with tried and tested menu ideas...in case we run out of things to think of for dinner.

to the right I pasted a list with dutch holidays.
I mark those on the last pages as well, since these are yearly overviews.

In this TN I also have a Midori zipper pouch.

A home made file folder with pen-loops.

A Midori card file.

And a journaling booklet.

Which will be full tonight...

I won't show pictures of the journaling booklet in this blogpost, since this one is picture heavy enough as it is.

I like decorating my booklets, but I'm not prone to using any one style...

I just use whatever I feel like.

Or even whatever I bump into at the time on my desk...


There's a little elephant, an oister I bought from a friend's shop and the remaining wings of a fairy I got in a swap last year...honestly, it was a fairy. It broke off, but as a reminder of the kindness of the person who sent it, I keep the wings on there ;-)
I hope you liked my boring diary pages anyhow and I wish you a lovely week.
I've been making my own diaries and inserts right from the start and have adapted the system to suit my needs. I've used several different lay-outs and setups through-out this period, but I think I have now found a setup that works exactly how I like it.
I have 4 RS TN's for different purposes, one for work, one for art journaling, one for my Etsy store and one personal journal and diary/agenda. I also have a Fieldnotes sized TN for lists and keeping track of online orders and a small Passport sized one that I use as a wallet.
At first I used a setup with a MOTP, a WOTP and a daily diary with a chronodex adaptation to fit a 24 hr day. As time progressed and I was slowly overcoming the symptoms of my burn-out, I found I didn't need a full daily page to keep track of what I was doing. I did however want to keep at least a page per week.
___Warning, picture heavy post___
I didn't like how everything was in seperate booklets and wanted to contain it all into one. So I designed a diary that would do all that, the MOTP, the weekly and a page per week for tasks and stuff.
This month I tried this setup out after having tested it for my work diary.
Here's the MOTP, which is followed by the weekly pages.
I felt the boxes were to dark, so for the new template I made the boxes thinner/lighter...but I'll have to wait till the new year comes around to use the new template...no sense wasting a perfectly good diary, right?
The first week I kept fairly simpel. Used a fountain pen with pink ink, bought originally for my daughter, but I think I'm going to keep it =)
Now I'm pretty sure these pictures are not very interesting for anyone who isn't interrested in diaries and planning and such.
Still, I thought I'd add them, just to give the complete picture ;-)
And who knows you might like this setup, in which case these pictures may give you an impression about how this can be used.
Now we've come to the next month and a few things are already entered in there, among other things, my 22nd wedding anniversary ;-)
As you can see, the monthly pages go before the weekly.
To keep the weeks from splitting I decided to place the monthly pages in front of the week where the thursday was in the new month. Like the way we decide wether the first day of the new year is also in the first week of the new year...
When I feel I don't have enough space or, like in this case, I want something I can move to another page/week, I use tip-ins with washi.
At the end of the booklet I pasted a list with tried and tested menu ideas...in case we run out of things to think of for dinner.
to the right I pasted a list with dutch holidays.
I mark those on the last pages as well, since these are yearly overviews.
In this TN I also have a Midori zipper pouch.
A home made file folder with pen-loops.
A Midori card file.
And a journaling booklet.
Which will be full tonight...
I won't show pictures of the journaling booklet in this blogpost, since this one is picture heavy enough as it is.
I like decorating my booklets, but I'm not prone to using any one style...
I just use whatever I feel like.
Or even whatever I bump into at the time on my desk...
I have 3 bookmarks, that I don't use as such, but I do like to keep some charms on there.
There's a little elephant, an oister I bought from a friend's shop and the remaining wings of a fairy I got in a swap last year...honestly, it was a fairy. It broke off, but as a reminder of the kindness of the person who sent it, I keep the wings on there ;-)
I hope you liked my boring diary pages anyhow and I wish you a lovely week.
How to add extra booklets to a Traveler's Notebook
I received several questions about how to add extra booklets to your traveler's notebook and since this is rather difficult to explain with just words, I thought I'd make a blogpost about it with pictures to make it easier to see.
As an example I used my Fieldnotes/Pocket sized Traveler's Notebook, with just one elastic (1 long and 1 short)

I took it completely apart, to show you how I add the notebooks to my TN and took lots of pictures...
When full it looks like this.

With a zipper file around the first booklet


A file folder with pen-loops around the second.


And lastly just a plain booklet.

Normally a Traveler's Notebook comes with 1 long and 1 short elastic down the middle. You can use the long elastic to insert one booklet and maybe the shorter one to inserts another.

I want to insert 3 booklets, a fie folder with pen-loops and a passport sized Midori zipper file

For this you take the two booklets you want on the outside and, in this case, fold the zipper file around the booklet you want it. You can add the zipper file any way you like, but this is how I have it in this TN.

Open the booklets in the middle and put them back to front. Take an extra elastic, either the Midori type elastics or a thin, knotted, elastic cord (which is what I use) and slide it over the back of the first and the front of the last booklet. Effectively pairing the booklets into a set.

Then take one of the booklets and slide it under the long elastic in the TN.

Pulling it all the way trhough, so that each booklet sits on either side of the long elastic.

Take the remaining booklet, fold the file folder, with the pen-loops, around it and slide it under the long elastic in the middle of the two other booklets.

You could also do this first and then slide the set of two booklets over this one, but by doing it the way I showed, the two outer booklets will sit more securely within the cover.

Both ways work though and some prefer the outer booklets to slide over.

The result will look something like this. You can take the bookmark and place it in your booklet.

Since my TN's have a slit at the top and bottom hole, I always tuck the bookmark between the bottom slit, thus securing the booklets even further.

You could also piggy back a booklet onto the spine of another, like with the file folder, but that would split this booklet in half and it will push the first booklet out in front. If this is not a problem for you, then this is another way to add more booklets.

Also If you like to have 4 (or more) booklets onto 1 elastic, you can repeat the pairing of the booklets any number of times. You can also Pair two sets of two by adding a third elastic through the middle of the sets and slide one whole set underneath the long notebook elastic as you would with one notebook of just the single set. This way you'll have a set of two notebooks on each side of the long notebook elastic.
You can go even further and attach notebooks with extra elastics to the other notebooks.
By increasing the numer of booklets in the TN, you will increase the width of the spine, which decreases the width of the cover and it will increase the weight of the Traveler's Notebook. =)
I make all my TN's with 2 long and 2 short elastics, so you can repeat this procedure on the other elastic in any combination you like. (In another blogpost I will show you how to add the elastics and bookmark to your cover.)
You should also remember that by using your inserts, they will get thicker, sometimes twice (or more) as thick. When you use your TN, bits and bobs will get tucked in, kept in the file folder or in the zipper file, these all add to the thickness of the TN, making it increasingly difficult to write in. So you may want to stick to 3 booklets, it might not seem a lot at first...but just wait and see, it'll fill up in no time =)

So yes, as the little card says, thanks for being lovely and I hope you enjoyed this. Should you have any questions, please don't hesitate to ask.
Have a lovely week.
As an example I used my Fieldnotes/Pocket sized Traveler's Notebook, with just one elastic (1 long and 1 short)
I took it completely apart, to show you how I add the notebooks to my TN and took lots of pictures...
When full it looks like this.
With a zipper file around the first booklet
A file folder with pen-loops around the second.
And lastly just a plain booklet.
Normally a Traveler's Notebook comes with 1 long and 1 short elastic down the middle. You can use the long elastic to insert one booklet and maybe the shorter one to inserts another.
I want to insert 3 booklets, a fie folder with pen-loops and a passport sized Midori zipper file
For this you take the two booklets you want on the outside and, in this case, fold the zipper file around the booklet you want it. You can add the zipper file any way you like, but this is how I have it in this TN.
Open the booklets in the middle and put them back to front. Take an extra elastic, either the Midori type elastics or a thin, knotted, elastic cord (which is what I use) and slide it over the back of the first and the front of the last booklet. Effectively pairing the booklets into a set.
Then take one of the booklets and slide it under the long elastic in the TN.
Pulling it all the way trhough, so that each booklet sits on either side of the long elastic.
Take the remaining booklet, fold the file folder, with the pen-loops, around it and slide it under the long elastic in the middle of the two other booklets.
You could also do this first and then slide the set of two booklets over this one, but by doing it the way I showed, the two outer booklets will sit more securely within the cover.
Both ways work though and some prefer the outer booklets to slide over.
The result will look something like this. You can take the bookmark and place it in your booklet.
Since my TN's have a slit at the top and bottom hole, I always tuck the bookmark between the bottom slit, thus securing the booklets even further.
You could also piggy back a booklet onto the spine of another, like with the file folder, but that would split this booklet in half and it will push the first booklet out in front. If this is not a problem for you, then this is another way to add more booklets.
Also If you like to have 4 (or more) booklets onto 1 elastic, you can repeat the pairing of the booklets any number of times. You can also Pair two sets of two by adding a third elastic through the middle of the sets and slide one whole set underneath the long notebook elastic as you would with one notebook of just the single set. This way you'll have a set of two notebooks on each side of the long notebook elastic.
You can go even further and attach notebooks with extra elastics to the other notebooks.
By increasing the numer of booklets in the TN, you will increase the width of the spine, which decreases the width of the cover and it will increase the weight of the Traveler's Notebook. =)
I make all my TN's with 2 long and 2 short elastics, so you can repeat this procedure on the other elastic in any combination you like. (In another blogpost I will show you how to add the elastics and bookmark to your cover.)
You should also remember that by using your inserts, they will get thicker, sometimes twice (or more) as thick. When you use your TN, bits and bobs will get tucked in, kept in the file folder or in the zipper file, these all add to the thickness of the TN, making it increasingly difficult to write in. So you may want to stick to 3 booklets, it might not seem a lot at first...but just wait and see, it'll fill up in no time =)
So yes, as the little card says, thanks for being lovely and I hope you enjoyed this. Should you have any questions, please don't hesitate to ask.
Have a lovely week.
A new quotes insert template
Recently I updated my Midori TN free inserts page with the link to the location where you can download them. I also added my new logo and the link to my Etsy shop. In case you would like me to make you a Traveler's Notebook or inserts for Traveler's Notebooks.
 Among the inserts are some templates with quotes I collected overt the past year and used with my art journals. An insert with random quotes and an insert with Hitchhikers Guide quotes by Douglas Adams, since this is one of my all time favorite books. I've shared these free templates already on my facebook page and in several Facebook groups, but thought I'd share them here as well.
I used the last one as a travel journal while on holiday and realy enjoyed the setup.
Among the inserts are some templates with quotes I collected overt the past year and used with my art journals. An insert with random quotes and an insert with Hitchhikers Guide quotes by Douglas Adams, since this is one of my all time favorite books. I've shared these free templates already on my facebook page and in several Facebook groups, but thought I'd share them here as well.
I used the last one as a travel journal while on holiday and realy enjoyed the setup.
 In one of the Facebook groups I'm a member of, Midori Traveler's Notebook Forum, a lovely lady, named Cassandra, posts daily quotes, QOTD. I thought it was a shame to see those quotes disappear into the stream of the timeline and asked her if she was alright with me collecting those quotes to gather them into a booklet. Which she was and she graciously allowed me to share the booklet.
Yesterday I printed my new journal booklet with Cassandra's quotes and made some covers to go with it. My daughter accompanied me while making a mess. We had a lot of fun together. She made the middle cover and I think it turned out beautiful.
In one of the Facebook groups I'm a member of, Midori Traveler's Notebook Forum, a lovely lady, named Cassandra, posts daily quotes, QOTD. I thought it was a shame to see those quotes disappear into the stream of the timeline and asked her if she was alright with me collecting those quotes to gather them into a booklet. Which she was and she graciously allowed me to share the booklet.
Yesterday I printed my new journal booklet with Cassandra's quotes and made some covers to go with it. My daughter accompanied me while making a mess. We had a lot of fun together. She made the middle cover and I think it turned out beautiful.
 We used some spray inks with stencils for these covers.
 Flipped them over after the first spray to get the reverse effect.
 Rubbed some ink into another stencil.
 Used stamps. old dictionary paper and washi tape to decorate a little further.
 The back cover is folded so we have room to keep some papers, ephemera and stuff in the back of the booklet.
 Added a little flap at the bottom of the back cover inside the flap. and added some decorative papers.
 Finaly we folded the printed papers for the insert and assembled the booklets. So here are some pictures of one of the finished inserts.
 Inside fron cover.
 Each right page has a quote.
 The back cover with the flap.
 And inserted an envelope and a pcture I wanted to keep.

 I'm afraid the lady didn't stamp as well as I wanted, but I still like it. She's one of my newest Stampers Anonymous stamps and I realy love these.
 So true....
 We had a lot of fun making these and I hope you enjoyed watching. Have fun making your own and I wish you a wonderful week.