

Lady Falcon Travelers
Painted leather Traveler's Notebook covers, on the outside....
Or...why I don't paint the inside of my covers with the same acrylics based leather dyes I use on the smooth outside.
I've gotten a few questions from people asking me if I could paint the inside of the leather Traveler's Notebook covers. The answer to that would have to be yes, of course I can paint the inside of the covers, however I choose not to do it. For a reason, a very good reason in my mind. =)
I do dye the insides of the covers with alcohol or oil based leather dyes. So there's plenty of color to be had ...

for instance, the above Nebula Traveler's Notebook, has a purple inside =)
To explain why I choose not to paint the inside, I would first have to explain something about the vegetable tanned leather I use.
The vegetable tanned saddle leather I use is 2.5 mm thick (6-6.5 oz). A cow hide is not uniformly thick, so to get the full grain leather with this thickness, the hides are split. The outside is the full grain outer skin. The inside, where the cut was made, has a rougher suede like appearance. With the tanning process these loose fibers get pressed down and it will look slightly flattish at first, but with time the fibers will loosen again.
Not all insides have the same length fibers, some are very short and some are fairly long...
Now if you dye this with acrylic leather paint and/or finisher, you will flatten the fibers at first. Depending on the type of finisher you use the fibers will stay down quite a while.
However in the end, and probably sooner rather then later, due to the nature of the use the notebook gets, ....folding it open and close repeatedly, ....these fibers will work themselves loose again. revealing the undyed natural leather color.

As an example I have here, my very first home made leather Traveler's Notebook. It was my daily carry for about a year and is still going strong, even though I did replace it a year ago with another black Traveler's Notebook...

As you can see, I do use these notebooks, so they look a bit scruffy from getting logged around all the time. Both have had about a years worth of daily abuse by now, so I think it is fair to compare them.
The first was dyed with an acrylic base dye and finisher, both inside and out and the second with an oil based (fiebings) leather dye.

The notebook on the left is showing some wear on the edges, where the dye has gone, showing the natural color of the leather. The right notebook doesn't have this at all. The dye doesn't lie on the surface, but has sunken into the leather. Other then some wear on the edges, with the acrylic based dye, you can see the dye is holding great!
On the inside however, this is a different story.

As you can see, the fibers are loosening and showing the natural color of the leather.

Which is not a problem and does nothing to the integrity of the leather, but when you have a pretty painting on the inside...it'll get all chipped and strange looking... which is also ok, if you don't mind that =)

With the alcohol or oil based dyes I use for the inside, this won't happen. After dyeing I brush them with a suede brush to get a nice and soft suede feeling surface.
You can still get different colors for the outside and inside.

and the outside can be painted, while still having the nice and soft interior.
I hope this helped explain this all a bit.
If you like to see more Traveler's Notebooks and or inserts you can follow me here:
Facebook Group: Lady Falcon Traveler's Notebooks
Facebook page: Morgan Le Fae's Trinkets
IG: LadyFalconTN
Flickr: Traveler's Notebooks
Etsy: MorganLeFaesTrinkets
Painted Traveler's Notebooks...
Á while back I discovered you can paint Leather Travelers Notebooks with acrylic paint, my all time favorite medium. Regular Acrylic paint will work, however special acrylics for leather are better and give a much nicer result.
Since then I have made quite a few Traveler's notebooks that were painted, among which are my painted lady and some nebula's. I tend to show some of the TN's I make in my facebook group, Lady Falcon Traveler's Notebooks and on my instagram, @LadyFalconTN, but somehow seem to forget to post them here...
So without further ado, here's my latest Weir Tree TN. It's an A6 Traveler's Notebook and it has one, larger/older , brother, or sister, in the world =)
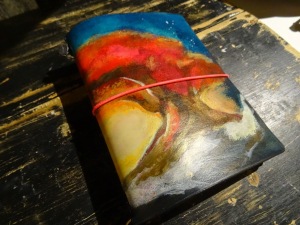
These are hand painted and since the leather doesn't take kindly to pencil, I can't sketch it out before hand.
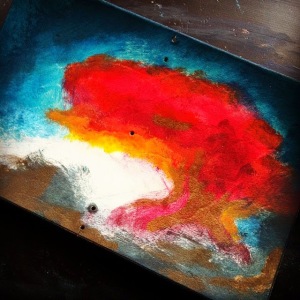
As you can see in the next picture, it's a rough sketch with paint, after which the rest gets painted, slowly building layer after layer.
I love working like this,
Feeling my way to the final stage.
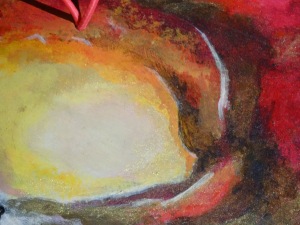
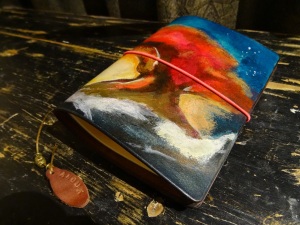
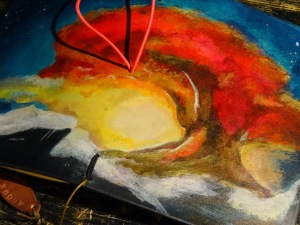
Trying to capture the light and how it bounces off the tree.
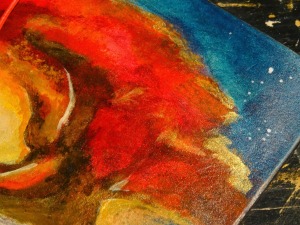
The stars in the sky are an extra challenge =) and usually leave me all starry looking as well.

Here it is next to my own A6 Traveler's Notebook.
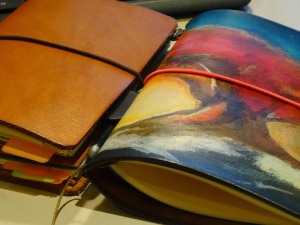
And the insert I made to go with it.
I always leave the inside with just the leather dye/stain, because this way I can brush the inside to make it nice and soft and suede like.

Positively pettable =)

The last few pics are from the previous Weir Tree, which is an XL Regular Size, a bit larger.
I would love to see both next to each other someday =)
I hope you enjoyed watching this and I wish you a wonderful weekend.
xx Monique
IG: LadyFalconTN
Flickr: Traveler's Notebooks
Etsy: MorganLeFaesTrinkets
Facebook:
Lady Falcon Traveler's Notebooks
Morgan Le Fae's Trinkets
Since then I have made quite a few Traveler's notebooks that were painted, among which are my painted lady and some nebula's. I tend to show some of the TN's I make in my facebook group, Lady Falcon Traveler's Notebooks and on my instagram, @LadyFalconTN, but somehow seem to forget to post them here...
So without further ado, here's my latest Weir Tree TN. It's an A6 Traveler's Notebook and it has one, larger/older , brother, or sister, in the world =)

These are hand painted and since the leather doesn't take kindly to pencil, I can't sketch it out before hand.

As you can see in the next picture, it's a rough sketch with paint, after which the rest gets painted, slowly building layer after layer.

I love working like this,

Feeling my way to the final stage.

Trying to capture the light and how it bounces off the tree.

The stars in the sky are an extra challenge =) and usually leave me all starry looking as well.

Here it is next to my own A6 Traveler's Notebook.

And the insert I made to go with it.

I always leave the inside with just the leather dye/stain, because this way I can brush the inside to make it nice and soft and suede like.

Positively pettable =)

The last few pics are from the previous Weir Tree, which is an XL Regular Size, a bit larger.
I would love to see both next to each other someday =)
I hope you enjoyed watching this and I wish you a wonderful weekend.
xx Monique
IG: LadyFalconTN
Flickr: Traveler's Notebooks
Etsy: MorganLeFaesTrinkets
Facebook:
Lady Falcon Traveler's Notebooks
Morgan Le Fae's Trinkets
Very short Blogpost...
I'm going to try something new today....I'm going to write a short blogpost... That's right, very short...
However, It is a rather long video =)
 Have a lovely weekend,
xx Monique
IG: LadyFalconTN
Flickr: Traveler's Notebooks
Etsy: MorganLeFaesTrinkets
Have a lovely weekend,
xx Monique
IG: LadyFalconTN
Flickr: Traveler's Notebooks
Etsy: MorganLeFaesTrinkets
[embed]https://www.youtube.com/embed/V7N833LgAu4[/embed]
It's a flip through of my Traveler's Notebook (s), both my personal planner and the TN I took with me on holiday to Italy with the Travelogue and the doodling booklets.
I hope you enjoy

A little trip and a travelogue to log it
Last week I went on a little trip to Italy with my family. We had lots of fun and mad loads of pictures. Over the years I noticed somehow those pictures are taken only to be never looked at again, or if you do look at them, you can't remember what was going on, or even where it was.
So the past few years I've taken to making a travelogue from all my trips. Sometimes quite elaborate, but usually just a brief journaling page per day with what we did and a few pics to go with it. Sometimes I draw, sometimes I don't. I just go with the flow.
This year I made a new template for my travelogue and made it available in my Facebook group, Lady Falcon Traveler's Notebooks
It started out looking like this

and ended up looking like this =)

Not as chunky as some I did before, but lovely and messy, just the way I like it.
The first night we were guided to the most adorable and delicious local Trattoria, where everything was home-made!

Reading glasses seem to be a must these days, not only for me =)

From the cottage we walked right into the woods, with the most amazing mushrooms.

We went to see the Tarot Gardens of Niki de Saint Phalle

Il Guardino Dei Tarocchi

Here are some of those amazing mushrooms.

And loads of pictures of the Tarot Garden

With the most amazing colors

The pictures do not do them justice!

Went to see a good friend near Rome

and stopped by Castel Gandolfo, where the new pope doesn't reside anymore....


Where we stuck our toes into the ocean...which was quite chilly still...

But the sun shone and we had a great time

Found out that these are colonies of tiny creatures that sail the seas, flagella flagella =)

Were given directions to the parking lot by a parking assistant in pure Italian and found out that hands and feet do work in aiding translation...

Had the most beautiful ice-cream from a little shop run by a lovely family in Porto De Giglio

And had our last dinner in Italy, for this trip, in Capalbio, near the cottage.

And had to fly back home again...

Sad and happy at the same time

La Dolce Vita indeed!

The coloring booklet you see, is available in my Facebook group (LadyFalconTN)

And I carried it all around with me in my Large Moleskine Cahier sized Traveler's Notebook.

Keeping some extra bits and pieces in the leather folder I made to go with it =)

The coloring booklet will get a follow up booklet made with original art from members of the Lady Falcon Traveler's Notebooks group. If you like to join this project, or would like to print your own coloring booklet for your Traveler's Notebook, please join us =)
I'll post the progress of the booklet and the drawings we are making here, for now, have a wonderful week.
xx Monique
IG: LadyFalconTN
Flickr: Traveler's Notebooks
Etsy: MorganLeFaesTrinkets
ps: The shop is closed for (most) physical items this week, as I try to catch up with everything and develop new stuff for in the shop, but you can always contact me through Etsy for custom requests. Digital items are available and a few already made items.
So the past few years I've taken to making a travelogue from all my trips. Sometimes quite elaborate, but usually just a brief journaling page per day with what we did and a few pics to go with it. Sometimes I draw, sometimes I don't. I just go with the flow.
This year I made a new template for my travelogue and made it available in my Facebook group, Lady Falcon Traveler's Notebooks
It started out looking like this

and ended up looking like this =)

Not as chunky as some I did before, but lovely and messy, just the way I like it.
The first night we were guided to the most adorable and delicious local Trattoria, where everything was home-made!

Reading glasses seem to be a must these days, not only for me =)

From the cottage we walked right into the woods, with the most amazing mushrooms.

We went to see the Tarot Gardens of Niki de Saint Phalle

Il Guardino Dei Tarocchi

Here are some of those amazing mushrooms.

And loads of pictures of the Tarot Garden

With the most amazing colors

The pictures do not do them justice!

Went to see a good friend near Rome

and stopped by Castel Gandolfo, where the new pope doesn't reside anymore....

We then went to the Island Giglio

Where we stuck our toes into the ocean...which was quite chilly still...

But the sun shone and we had a great time

Found out that these are colonies of tiny creatures that sail the seas, flagella flagella =)

Were given directions to the parking lot by a parking assistant in pure Italian and found out that hands and feet do work in aiding translation...

Had the most beautiful ice-cream from a little shop run by a lovely family in Porto De Giglio

And had our last dinner in Italy, for this trip, in Capalbio, near the cottage.

And had to fly back home again...

Sad and happy at the same time

La Dolce Vita indeed!

The coloring booklet you see, is available in my Facebook group (LadyFalconTN)

And I carried it all around with me in my Large Moleskine Cahier sized Traveler's Notebook.

Keeping some extra bits and pieces in the leather folder I made to go with it =)

The coloring booklet will get a follow up booklet made with original art from members of the Lady Falcon Traveler's Notebooks group. If you like to join this project, or would like to print your own coloring booklet for your Traveler's Notebook, please join us =)
I'll post the progress of the booklet and the drawings we are making here, for now, have a wonderful week.
xx Monique
IG: LadyFalconTN
Flickr: Traveler's Notebooks
Etsy: MorganLeFaesTrinkets
ps: The shop is closed for (most) physical items this week, as I try to catch up with everything and develop new stuff for in the shop, but you can always contact me through Etsy for custom requests. Digital items are available and a few already made items.
A6, Fieldnotes/Pocket or Passport booklet making tutorial
Just a quick post today, with a video tutorial I made about printing and making A6, Fieldnotes (Pocket), Passport sized booklets when you onlu have A4 sized paper.
I don't think this will work with letter sized paper, because the dimensions and proportions are not completely comparable to A4 paper. However, the templates for FN and PP booklets might work.
If you do get it to work, please let me know =)

 Definitely feel like everything is coming together.
 I can take everything I've learned in the past years...
 And pour it into these notebooks =)
 This little passport traveler will go up in my shop soon and if you want to make your own booklets, I have several templates freely available. I also sell templates through my Etsy shop, as instant downloads.
Please remember, there's a difference between the A6/FN/PP templates for A5 printing and those that are A4 printing, as I showed in the video.
If you want a specific template, but can't find it, you can always drop me a line and I will try to make it together with you and for you.
I hope you enjoy making your booklets. If you have any questions, please don't hesitate to ask. I will do my best to answer all.
Have a wonderful day.
This little passport traveler will go up in my shop soon and if you want to make your own booklets, I have several templates freely available. I also sell templates through my Etsy shop, as instant downloads.
Please remember, there's a difference between the A6/FN/PP templates for A5 printing and those that are A4 printing, as I showed in the video.
If you want a specific template, but can't find it, you can always drop me a line and I will try to make it together with you and for you.
I hope you enjoy making your booklets. If you have any questions, please don't hesitate to ask. I will do my best to answer all.
Have a wonderful day.
[youtube=http://www.youtube.com/watch?v=ZEssAIdOvto]
I also have a few pictures of the little passport I made.
I made it last night after I came home from work and drove for 1.5 hrs through a whole lot of snow....
It's so much fun to make these.
Announcing the winner.. and a painted passport TN
This will be a very short blogpost, with just the video announcing the winner of the giveaway from the previous blogpost Traveler's Notebook.
 When I started I didn't know if it was going to work...
I just knew I wanted to try it!
When I started I didn't know if it was going to work...
I just knew I wanted to try it!
 Gave it a shot and was pleasantly surprised about the result.
 The original painting isn't with me, because it lives in a Round Robin book in Germany ;-)
 I was rather sad to see it go, but made several pictures and have been using it for my business card and things like that. I love the colors and the feel of the painting.
 I wasn't sure if I would be able to reproduce it, because, honestly, I never know what I do/did....I just do....
 But I think it turned out rather well and it even looks cool with my lovely vintage Lady Falcon pen =)
Anyway, back to the give-away... Congratulations Tabatha, your notebook is coming your way, I hope you will enjoy using it as much as I did making it =)
But I think it turned out rather well and it even looks cool with my lovely vintage Lady Falcon pen =)
Anyway, back to the give-away... Congratulations Tabatha, your notebook is coming your way, I hope you will enjoy using it as much as I did making it =)
 Have a wonderful weekend.
[youtube=http://www.youtube.com/watch?v=ncXM7l_0c-I]
So a short blogpost and a short video, that would be a first right? =)
Maybe even a bit too short...
How about a little eye candy then, my newest addition to my Traveler's Notebook family. Meet my super cute wallet passport Traveler's Notebook.
CLOSED My very first Pyrography Traveler's Notebook and a giveaway
At the beginning of last year I saw some beautiful Traveler's Notebook that were made with a technique called leather burning, pyrography. Inspired by this I set out to gather all the materials needed to give this a shot. Made a trial piece in leather and then somehow never got any further.


 A Month on 2 pages diary for 2015, with extra room for notes after each month.
 An undated week on two pages diary, with a vertical format.
 And next to the plain insert I always add, there's also a folder with 2 pen-loops.

I guess I was just scared to ruin it and didn't trust myself enough to just go and do it. Well last week I gathered all the courage I could muster and went for it. Fail or no fail, I was going to make a Traveler's Notebook with pyrography.
And I did =)
[embed]https://www.youtube.com/v/SI5IG6PEBCA[/embed]
Now I'm definitely not an expert at this technique, but I had fun doing it and I think it turned out rather nice. =)
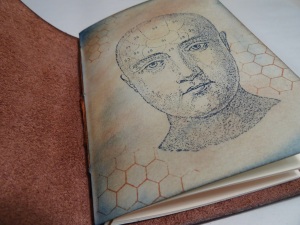
I started with an undeyed piece of leather, just like the trial I did last year March. I did a quick outline sketch with pencil and freehanded the rest of the wolfshead and the text onto the leather with the burning tool.
Oddly enough though, after dyeing the leather, most of the dark lines turned out light. To give it a little extra definition, I took a brush and some leather dye and added some dark accents.
Added some stamping for some extra texture.
I really like all those browns together.
Now I also promised I would do a giveaway, but with the Christmas and some health issues in December, somehow I just didn't get around to do this. Things are looking up though and that's why I thought it might be nice to make this Traveler's Notebook the TN for the giveaway.
That's why I added some extra inserts to it.
So the winner of the giveaway can start right of the bat with a full Traveler's Notebook, with room to spare, because it's the XL regular sized TN and it fits quite a bit more booklets, as you can see in the video I made.
So, how then to enter into the give away. There are, obviously, a few rules:
* Subscribe to my channel and leave comment on the video (moniquevmb)
* Subscribe to my blog and comment on this blogpost
* Like my Facebook page and leave a comment on the related post (https://www.facebook.com/MorganLeFaesTrinkets)
Each one of these will give you an extra entry for the giveaway...
I will enter all into an online raffle thingy. Now I am new to this, so I have no clue as to how these things work, so bear with me, while I figure this out.
You are welcome to enter from around the world, You do have to send me your address though, when you win and want me to send it to you ;-)
Next week on sunday, the 25th of January, I will announce the winner of the giveaway.
I hope you like this.
Good luck with the giveaway and a wonderful week to you all =)
The making of a leather "Journey" Travelers's Notebook...
And the mess it creates.
A while back I got a request for an A5 Traveler's Notebook by a lovely lady. Who made the mistake of giving me free reign in making it. Luckily she loves to create art as well. With that in mind and the fact that she planned on using it as an art journal I figured I could play a little.
I first tested the idea on a Traveler's Notebook I felt I ruined with some wrong stamping... I couldn't make it worse, right.
It turned out great, better even then expected.... and it left my whole Kitchen counter looking like a disaster area. I don't have a special art room and since I, obviously, was to enthusiastic and eager to try it, I didn't take any precautions. Which I should have, because I sprayed the leather dye... and I have sprayed inks before, so I should have known.
 I did take some pictures while making this, so I'll try and explain what I did, should you want to try this at home.
Please remember the leather dyes I use (and are suitable to do this) are permanent inks. It will create a mess, so please protect the surroundings of your project... thoroughly!
I started with pouring the leather dye into a spray can and placed the TN in a box to keep the spray from spreading. Notice the papers in front of the box...those are needed as well!
I did take some pictures while making this, so I'll try and explain what I did, should you want to try this at home.
Please remember the leather dyes I use (and are suitable to do this) are permanent inks. It will create a mess, so please protect the surroundings of your project... thoroughly!
I started with pouring the leather dye into a spray can and placed the TN in a box to keep the spray from spreading. Notice the papers in front of the box...those are needed as well!
 I masked the word with some letters I had and several templates. The corners were masked with some torn paper kitchen towels. In some places I moved the templates to a different spot after spraying and rubbed the dye into the gaps. The light brown color is the natural undyed leather color.
I removed the letters with some tweezers, because they were too small to pick up by hand and I didn't want to get any dye onto the undyed parts.
I masked the word with some letters I had and several templates. The corners were masked with some torn paper kitchen towels. In some places I moved the templates to a different spot after spraying and rubbed the dye into the gaps. The light brown color is the natural undyed leather color.
I removed the letters with some tweezers, because they were too small to pick up by hand and I didn't want to get any dye onto the undyed parts.
 I felt the natural color was a little too light, so I dyed the entire TN with the a yellow color.
 To add some extra interest, I used several stamps in coffee color.
 Which, I think, made it all come together.
 Then for the standard finishing touches, I finished the edges with an edge slicker to make them nice, smooth and shiny.
 Brushed the inside with a suede brush, as I do with all my TN's, because I like a soft inside. Sprayed some suede conditioner on the inside and oiled the outside. Added some elastics and booklets and the TN was ready for use.
That was easy right? And this time only the inside of the box looked like the dye exploded.
Here's the finished Traveler's Notebook with inserts.
Brushed the inside with a suede brush, as I do with all my TN's, because I like a soft inside. Sprayed some suede conditioner on the inside and oiled the outside. Added some elastics and booklets and the TN was ready for use.
That was easy right? And this time only the inside of the box looked like the dye exploded.
Here's the finished Traveler's Notebook with inserts.
 With some extra elastic in the little envelope.
 And a few A5 inserts I made.
 It's ready for use...
 As an art journal, or anything else she would like to use it for.
 Almost forgot to mention, I also darkened the edges of the TN with the same coffee ink I used for the stamps.
 To give it a more vintage used look.
 I feel the edging makes it come to life. and gives it just that little extra ;-)
I hope you enjoyed this and maybe even try it at home. Remember I cannot be held responsible for any mess you make when trying this... did I say it is permanent ink... because it is ;-)
Have fun trying this and if you do, please let me know the result.
Have a lovely weekend.
I feel the edging makes it come to life. and gives it just that little extra ;-)
I hope you enjoyed this and maybe even try it at home. Remember I cannot be held responsible for any mess you make when trying this... did I say it is permanent ink... because it is ;-)
Have fun trying this and if you do, please let me know the result.
Have a lovely weekend.
My daily Traveler's Notebook, planner and common place book / journal
Today I finally made a video flip through of my daily Traveler's Notebook. I think a new video was long overdue, specialy now that I'm approaching 1000 subscribers on YouTube....
 It replaces my old (32, sadly not 42) work TN.
 Finding new ways to work with leather.. well I needed a new pen-case....
 The black pen-case is the second I made and the brown one below is the first one I made, the prototype so to speak..
 Made one for my daughter as well and plan to start selling them, once my leather supplier has sourced the right leather.
I'm using the Traveler's Notebooks as a planner, journal, for my etsy shop and as an art journal.
Made one for my daughter as well and plan to start selling them, once my leather supplier has sourced the right leather.
I'm using the Traveler's Notebooks as a planner, journal, for my etsy shop and as an art journal.
 And have quite a few in use at the moment...
 I love the versatility of these notebook covers ;-)
I hope you liked my little video flip-through and I hope to be back soon with a give away.
Have a wonderful week
I love the versatility of these notebook covers ;-)
I hope you liked my little video flip-through and I hope to be back soon with a give away.
Have a wonderful week
[embed]https://youtu.be/GKBmkBo-U6o[/embed]
Which also means there's a giveaway coming. =)
First for the 1000 subscriber mark and secondly to celebrate the fact that I've now been making Traveler's Notebook for over a year and still loving them. Finding new ways to use them and trying out new techniques, like with my new "Journey" TN.
NaNoWriMo, how about that book cover...
With me essentialy being a discovery writer, also described as "seat of my pants" writer (in short, a pantser), or a gardener (as opposed to, respectively, an outliner, a planner, or an architect), I'm not entirely sure how I should prepare for the upcoming month.
As I told you last time, I made an inspirational booklet and downloaded Scrivener. Since then I also adapted the highschool workbook for the young writers into a Traveler's Notebook format, so my daughter could take it with her in her TN. That took some time, but was fun to do. They are nice to read and use even if you're not in high school. I made it available in my dropbox folder (you can find the link to the dropbox on my Midori TN free inserts page).
 I played a little with Scrivener and, to be honest, I am impressed, so I'm keeping it. Watched some video's about outlining and prepping for NaNoWriMo (for instance Kaytastic's channel for the writing point of view and Ellen Brock's channel for the editor's point of view) and tried to implement some outlining by making chapters and character sheets in Scrivener (some great ones for Scrivener you can find here on Caroline Norrington's site). After which I came to a full stop.
My brain freezes up when I look at all those questions and prompts. All I can do is look at them in agony and despair. I can hear my mind coming to a screeching halt, "That much? What? Why?".
It would appear that this is just not how my brain works.
I know by now, I can write a story, I can create characters that come to life in the readers mind and build a plot that keeps people reading. Last year I did no prepping whatsoever, I only decided to step in halfway the first week. Did some quick brainstorm sessions on some scrap pieces of paper folded into my Traveler's Notebook and just started writing. Troughout the month I continued these quick brainstorms every day. Always in pen to paper and always barely readable. In essence they were only there to trigger images in my mind. Writing to me is translating those images into words. I like to let the story unfold before my eyes. It's like reading a book.
I played a little with Scrivener and, to be honest, I am impressed, so I'm keeping it. Watched some video's about outlining and prepping for NaNoWriMo (for instance Kaytastic's channel for the writing point of view and Ellen Brock's channel for the editor's point of view) and tried to implement some outlining by making chapters and character sheets in Scrivener (some great ones for Scrivener you can find here on Caroline Norrington's site). After which I came to a full stop.
My brain freezes up when I look at all those questions and prompts. All I can do is look at them in agony and despair. I can hear my mind coming to a screeching halt, "That much? What? Why?".
It would appear that this is just not how my brain works.
I know by now, I can write a story, I can create characters that come to life in the readers mind and build a plot that keeps people reading. Last year I did no prepping whatsoever, I only decided to step in halfway the first week. Did some quick brainstorm sessions on some scrap pieces of paper folded into my Traveler's Notebook and just started writing. Troughout the month I continued these quick brainstorms every day. Always in pen to paper and always barely readable. In essence they were only there to trigger images in my mind. Writing to me is translating those images into words. I like to let the story unfold before my eyes. It's like reading a book.
 So how then to prep for NaNoWriMo, when I'm not going to outline anything.
This question had been haunting me for a few days, when I noticed a tiny thing on the NaNoWriMo site.
So how then to prep for NaNoWriMo, when I'm not going to outline anything.
This question had been haunting me for a few days, when I noticed a tiny thing on the NaNoWriMo site.
 "NaNo Stats show: Uploading a novel cover increases your chance of winning by 60%"
Right, so that should be right up my alley, make a novel cover! It's prepping, it's visual, it's brainstorming and I get to play with all kinds of media! I can do that!
Therefore that's what I'm going to be doing next week running up to NaNovember. I think it'll be fun. I already made a mood board on pinterest with some old school SCI-FI covers, collected some fonts I'd like to use and searched for some tutorials on how to make a novel cover. Now all I need to do is bring out the paints and make a mess.
If you're doing NaNoWriMo, what are you doing to get ready for it? Let me know in the comments, I'd love to hear it =)
Have a lovely weekend.
"NaNo Stats show: Uploading a novel cover increases your chance of winning by 60%"
Right, so that should be right up my alley, make a novel cover! It's prepping, it's visual, it's brainstorming and I get to play with all kinds of media! I can do that!
Therefore that's what I'm going to be doing next week running up to NaNovember. I think it'll be fun. I already made a mood board on pinterest with some old school SCI-FI covers, collected some fonts I'd like to use and searched for some tutorials on how to make a novel cover. Now all I need to do is bring out the paints and make a mess.
If you're doing NaNoWriMo, what are you doing to get ready for it? Let me know in the comments, I'd love to hear it =)
Have a lovely weekend.
NaNoWriMo prep for 2014
Joining the NaNoWriMo fun again this year and this time I decided to come prepared to the battlefield, so that, by the time november first comes along, I can hit the road running...
Now I'm not sure if I'm going to accomplish that, but I am at least going to give it a shot.
 First of all I felt I needed a notebook, since NaNoWriMo is writing, ergo pen and paper...
So I designed an inspirational booklet to accompany me throughout the month, for notes, for inspiration, for wordcounts and journaling about anything NaNo related (or not...). I made the booklet freely available via my dropbox (the link to which you can find here).
I also made a Fieldnotes sized version (also available in my dropbox), but since I'm going to tackle this with my Regular sized Traveler's Notebook, I made the Regular size for me ;-)
First of all I felt I needed a notebook, since NaNoWriMo is writing, ergo pen and paper...
So I designed an inspirational booklet to accompany me throughout the month, for notes, for inspiration, for wordcounts and journaling about anything NaNo related (or not...). I made the booklet freely available via my dropbox (the link to which you can find here).
I also made a Fieldnotes sized version (also available in my dropbox), but since I'm going to tackle this with my Regular sized Traveler's Notebook, I made the Regular size for me ;-)
 Even though I promised myself I would only start decorating in November... I'm afraid I couldn't help myself...just a little bit...
and no, I'm not going to Write About Dragons, though I did get lots of information and inspiration from their YouTube channel.
Even though I promised myself I would only start decorating in November... I'm afraid I couldn't help myself...just a little bit...
and no, I'm not going to Write About Dragons, though I did get lots of information and inspiration from their YouTube channel.
 I used the free logo from the NaNoWriMo website for this years participants to add some color and NaNo personality to the booklet. Actualy I used the NaNoWriMo logo through-out the booklet to keep it on theme.
 I designed it, with an overview of the month in the beginning, so you can add your NaNo appointments, your write-ins and such...
 Followed by the, oh so, important "Pledge" page, because as they say on the NaNoWriMo website, "Intention is everything". You can add your intentions here and write a little about the book you want to write.
 The rest of the booklet consists of two pages a day for the whole NaNo month, with some prompts, a word count box and lots of writing related quotes to keep you inspired.
 The last page of the booklet is the summary page, where you can keep track of your progress and, well, the quote that says it all.
 So I have begun...now for the rest....
Next step would be to actualy think about what I am going to write... and obviously, since procrastination is my middel name (well it could be)..., I decided I needed something other than word to do my actual novel writing with.
So I have begun...now for the rest....
Next step would be to actualy think about what I am going to write... and obviously, since procrastination is my middel name (well it could be)..., I decided I needed something other than word to do my actual novel writing with.
 I heard so many good stories about Scrivener so I downloaded it, installed it, imported last year's story into it and started my 30 day trial. After which I will decide if I'm going to continue with it....or fall back to my initial setup....just plain writing in word.
So far so good, I'm ready, let the writing commence.
I wish you all a lovely week.
Want to join NaNoWriMo for november 2014, here's the link to the website.
I heard so many good stories about Scrivener so I downloaded it, installed it, imported last year's story into it and started my 30 day trial. After which I will decide if I'm going to continue with it....or fall back to my initial setup....just plain writing in word.
So far so good, I'm ready, let the writing commence.
I wish you all a lovely week.
Want to join NaNoWriMo for november 2014, here's the link to the website.
Double threading elastic for your Traveler's Notebook
Since I started making Traveler's Notebooks I have tried out several different ways to thread the elastic through the spine to keep the notebooks inside.
Obviously I started with the normal method, which is one thread, this is realy plenty to keep the notebooks in place.

You start with keeping a length of elastic on the side, long enough to go from the bottom to the top.

Thread the rest through the second hole from the back to the front and up through the next hole, back to the outside.

Go over the top and pull the elastic into the slit at the top. Come all the way down and pull it through the slit on de bottom, to the back.
If your's doesn't have a slit, you'll have to thread it through the holes, from the outside to the inside at the top hole and the reverse at the bottom hole.
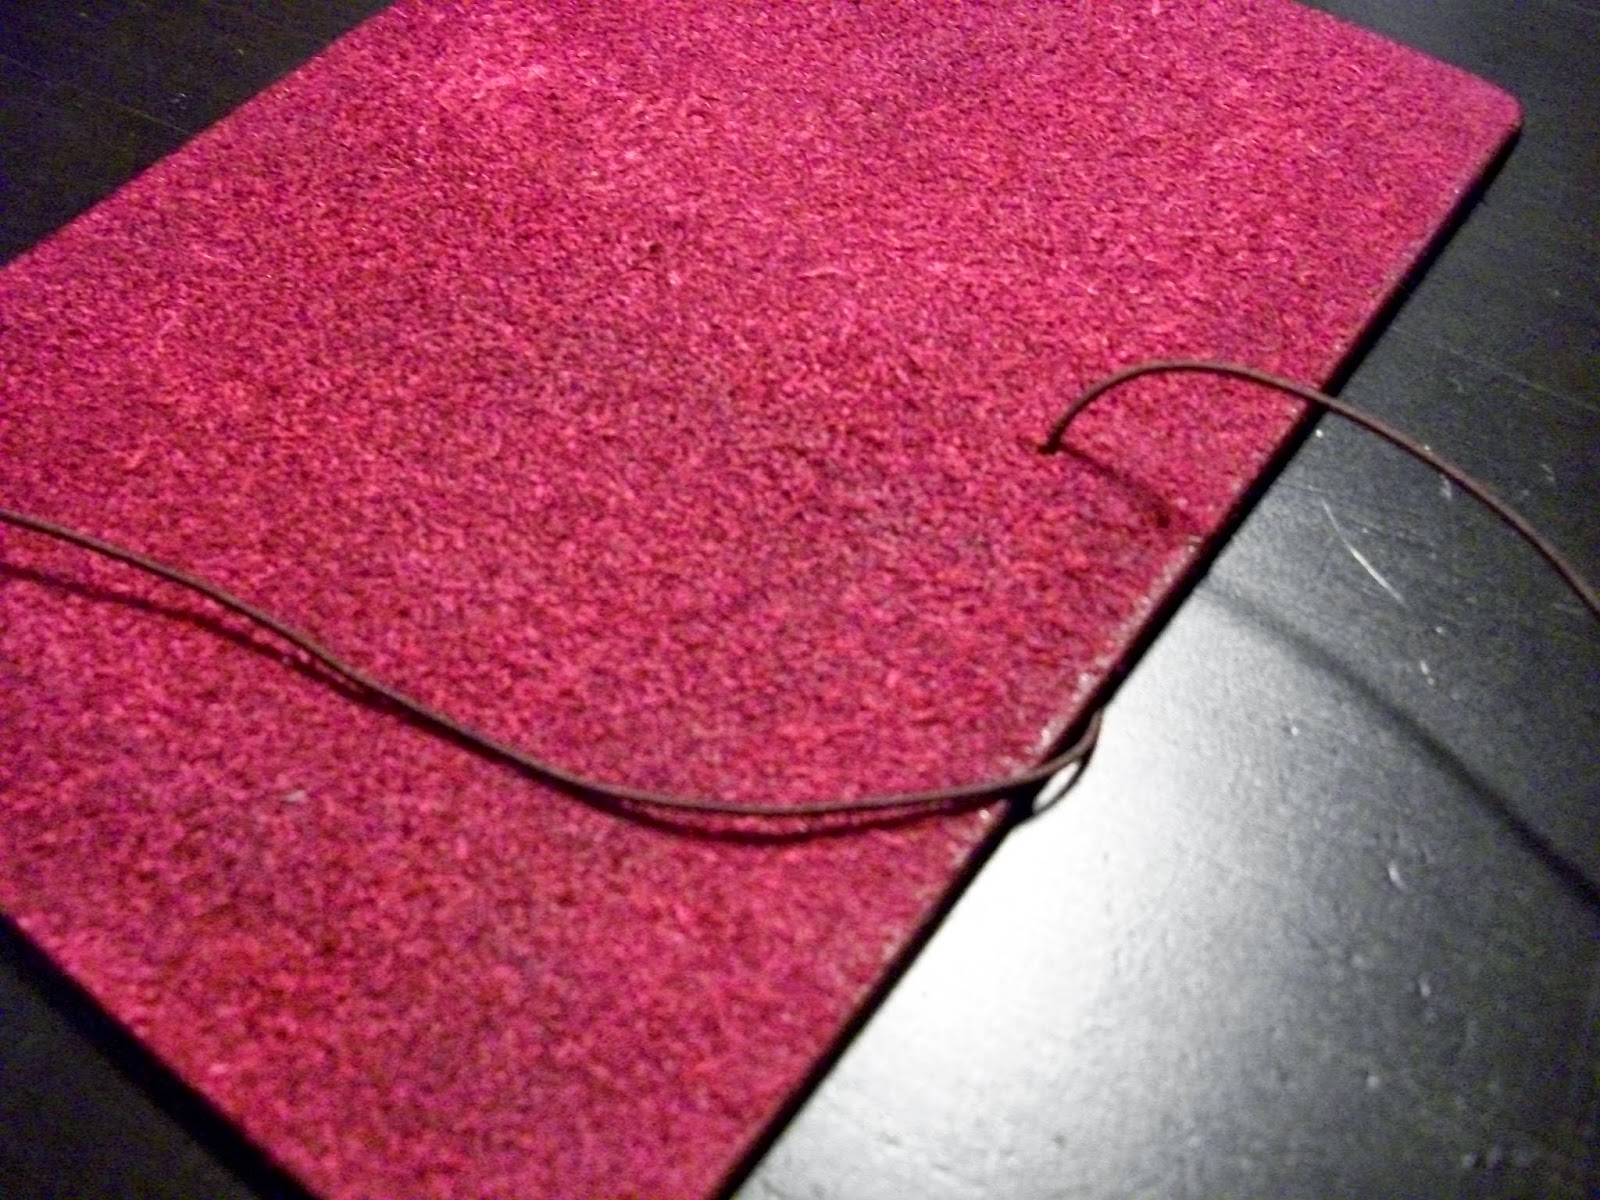
Now you flip it over to put the elastic through the second hole from the bottom. To aid me in pulling the elastic through the hole I use a wire folded in half, kinda like a hair pin.

As you can see, it goes through the same hole we started with, the loose end is still there.

From the inside it looks like this after you've pulled it through. Next step is to pull it through the second hole from the top, not the far top hole. From the inside to the outside.

Now all you have to do is to pull the loose elastic, which we left at the beginning, up through the bottom hole slit, up and around to the back, through the top hole slit.
In case you don't use the tin clasp, you can just pull the top elastic to the inside and the bottom one as well. You can then tie a knot in them on the inside and be done. You'll also have to tie your waxed cord for the bookmark to one of the elastics.

At the top on the outside you now have two bits of elastic. You can put each elastic through one of the holes on the underside of the tin clasp (there are 2 on the underside and 1 at the top).
Take the waxed cord and pull through the hole next to the top elastic, using the same folded wire (or anything else that's strong enough)

You now have something that looks like this.
Take the top elastic and the waxed cord in one hand, the bottom elastic in the other and tie a knot.


When the knot is sunken well into the clasp, close the clasp by either tapping it with a hammer, or squeeze it with pliers, like I ususaly do.
I use a little scrap piece of leather to keep the clasp from getting scarred by the pliers. You don't need to do that, I just prefer it this way. It not only protects the clasp, but also the leather from getting scratched by the tools. Which is another reason why I prefer not to use a hammer.
This piece of leather will last you a long time. It has been my aid since I first started using the tin clasps almost a year ago now. Closing the clasp doesn't need a lot of pressure, but be sure to squeeze it nice and tight.

You can now cut the bits sticking out, right next to the clasp. Pull the waxed cord to the front, if you haven't already and cut it to size. Don't cut it too short, because you may want to tie some dangly things from it =)
All you need now is an elastic to keep your Traveler's notebook closed and you're good to go...well and some inserts of course...

I hope this has been helpful. Should you have any questions about any of this, please don't hesitate to ask.
I wish you a wonderful weekend.
Obviously I started with the normal method, which is one thread, this is realy plenty to keep the notebooks in place.
However I got so many requests to put two elastics in the spine, that I started trying out different ways to thread the elastic. I looked around for ways other people were threading their Traveler's Notebooks and found several, but none of them really appealed to me.
The first and easiest way I found would be the sideways threading, as opposed to the regular vertical threading. This seems very nice in the beginning, but has a tendency to deform the spine, so that wasn't going to work for me.
I also like to use the little tin clasp, since it performs two functions. It not only keeps the elastic for the spine, but it also holds the bookmark, keeping the amount of knots needed to attach everything to a minimum.
Threading two elastics and the bookmark through the little tin clasp is a challenge, since it is so small. You'd have to fiddle it through, tie a knot and then squeeze it closed. Plus I had a terrible time keeping the elstics nicely lined up, major OCD kicking in...yeah, that didn't work out too great. At least not the way I like it.
So I came up with an alternative threading, where I thread one long elastic through the spine twice, attach the waxed cord for the bookmark, keep everything lined up nicely and still easily use the tin claps to secure it all.
You start with keeping a length of elastic on the side, long enough to go from the bottom to the top.
Thread the rest through the second hole from the back to the front and up through the next hole, back to the outside.
Go over the top and pull the elastic into the slit at the top. Come all the way down and pull it through the slit on de bottom, to the back.
If your's doesn't have a slit, you'll have to thread it through the holes, from the outside to the inside at the top hole and the reverse at the bottom hole.
Now you flip it over to put the elastic through the second hole from the bottom. To aid me in pulling the elastic through the hole I use a wire folded in half, kinda like a hair pin.
As you can see, it goes through the same hole we started with, the loose end is still there.
From the inside it looks like this after you've pulled it through. Next step is to pull it through the second hole from the top, not the far top hole. From the inside to the outside.
Now all you have to do is to pull the loose elastic, which we left at the beginning, up through the bottom hole slit, up and around to the back, through the top hole slit.
In case you don't use the tin clasp, you can just pull the top elastic to the inside and the bottom one as well. You can then tie a knot in them on the inside and be done. You'll also have to tie your waxed cord for the bookmark to one of the elastics.
At the top on the outside you now have two bits of elastic. You can put each elastic through one of the holes on the underside of the tin clasp (there are 2 on the underside and 1 at the top).
Take the waxed cord and pull through the hole next to the top elastic, using the same folded wire (or anything else that's strong enough)
You now have something that looks like this.
Take the top elastic and the waxed cord in one hand, the bottom elastic in the other and tie a knot.
Nice and tight,... but not too tight. You want the elastics to be firm enough to hold your booklets, but not so firm that they will tear your booklets.
The waxed cord sticking out is probably too long at this point and since we don't want to waste any, you pull it as short as you can. By doing this, usualy, the little knot disappears into the tin clasp. If it doesn't, pull the elastics on the inside to get the knot safely lodged inside the tin clasp. Remember to pull them all together.
When the knot is sunken well into the clasp, close the clasp by either tapping it with a hammer, or squeeze it with pliers, like I ususaly do.
I use a little scrap piece of leather to keep the clasp from getting scarred by the pliers. You don't need to do that, I just prefer it this way. It not only protects the clasp, but also the leather from getting scratched by the tools. Which is another reason why I prefer not to use a hammer.
This piece of leather will last you a long time. It has been my aid since I first started using the tin clasps almost a year ago now. Closing the clasp doesn't need a lot of pressure, but be sure to squeeze it nice and tight.
You can now cut the bits sticking out, right next to the clasp. Pull the waxed cord to the front, if you haven't already and cut it to size. Don't cut it too short, because you may want to tie some dangly things from it =)
All you need now is an elastic to keep your Traveler's notebook closed and you're good to go...well and some inserts of course...
I hope this has been helpful. Should you have any questions about any of this, please don't hesitate to ask.
I wish you a wonderful weekend.