
Country

  • Afghanistan (AFN ؋)
  • Åland Islands (EUR €)
  • Albania (ALL L)
  • Algeria (DZD د.ج)
  • Andorra (EUR €)
  • Angola (EUR €)
  • Anguilla (XCD $)
  • Antigua & Barbuda (XCD $)
  • Argentina (EUR €)
  • Armenia (AMD դր.)
  • Aruba (AWG ƒ)
  • Ascension Island (SHP £)
  • Australia (AUD $)
  • Austria (EUR €)
  • Azerbaijan (AZN ₼)
  • Bahamas (BSD $)
  • Bahrain (EUR €)
  • Bangladesh (BDT ৳)
  • Barbados (BBD $)
  • Belarus (EUR €)
  • Belgium (EUR €)
  • Belize (BZD $)
  • Benin (XOF Fr)
  • Bermuda (USD $)
  • Bhutan (EUR €)
  • Bolivia (BOB Bs.)
  • Bosnia & Herzegovina (BAM КМ)
  • Botswana (BWP P)
  • Brazil (EUR €)
  • British Indian Ocean Territory (USD $)
  • British Virgin Islands (USD $)
  • Brunei (BND $)
  • Bulgaria (BGN лв.)
  • Burkina Faso (XOF Fr)
  • Burundi (BIF Fr)
  • Cambodia (KHR ៛)
  • Cameroon (XAF CFA)
  • Canada (CAD $)
  • Cape Verde (CVE $)
  • Caribbean Netherlands (USD $)
  • Cayman Islands (KYD $)
  • Central African Republic (XAF CFA)
  • Chad (XAF CFA)
  • Chile (EUR €)
  • China (CNY ¥)
  • Christmas Island (AUD $)
  • Cocos (Keeling) Islands (AUD $)
  • Colombia (EUR €)
  • Comoros (KMF Fr)
  • Congo - Brazzaville (XAF CFA)
  • Congo - Kinshasa (CDF Fr)
  • Cook Islands (NZD $)
  • Costa Rica (CRC ₡)
  • Côte d’Ivoire (XOF Fr)
  • Croatia (EUR €)
  • Curaçao (ANG ƒ)
  • Cyprus (EUR €)
  • Czechia (CZK Kč)
  • Denmark (DKK kr.)
  • Djibouti (DJF Fdj)
  • Dominica (XCD $)
  • Dominican Republic (DOP $)
  • Ecuador (USD $)
  • Egypt (EGP ج.م)
  • El Salvador (USD $)
  • Equatorial Guinea (XAF CFA)
  • Eritrea (EUR €)
  • Estonia (EUR €)
  • Eswatini (EUR €)
  • Ethiopia (ETB Br)
  • Falkland Islands (FKP £)
  • Faroe Islands (DKK kr.)
  • Fiji (FJD $)
  • Finland (EUR €)
  • France (EUR €)
  • French Guiana (EUR €)
  • French Polynesia (XPF Fr)
  • French Southern Territories (EUR €)
  • Gabon (XOF Fr)
  • Gambia (GMD D)
  • Georgia (EUR €)
  • Germany (EUR €)
  • Ghana (EUR €)
  • Gibraltar (GBP £)
  • Greece (EUR €)
  • Greenland (DKK kr.)
  • Grenada (XCD $)
  • Guadeloupe (EUR €)
  • Guatemala (GTQ Q)
  • Guernsey (GBP £)
  • Guinea (GNF Fr)
  • Guinea-Bissau (XOF Fr)
  • Guyana (GYD $)
  • Haiti (EUR €)
  • Honduras (HNL L)
  • Hong Kong SAR (HKD $)
  • Hungary (HUF Ft)
  • Iceland (ISK kr)
  • India (INR ₹)
  • Indonesia (IDR Rp)
  • Iraq (EUR €)
  • Ireland (EUR €)
  • Isle of Man (GBP £)
  • Israel (ILS ₪)
  • Italy (EUR €)
  • Jamaica (JMD $)
  • Japan (JPY ¥)
  • Jersey (EUR €)
  • Jordan (EUR €)
  • Kazakhstan (KZT ₸)
  • Kenya (KES KSh)
  • Kiribati (EUR €)
  • Kosovo (EUR €)
  • Kuwait (EUR €)
  • Kyrgyzstan (KGS som)
  • Laos (LAK ₭)
  • Latvia (EUR €)
  • Lebanon (LBP ل.ل)
  • Lesotho (EUR €)
  • Liberia (EUR €)
  • Libya (EUR €)
  • Liechtenstein (CHF CHF)
  • Lithuania (EUR €)
  • Luxembourg (EUR €)
  • Macao SAR (MOP P)
  • Madagascar (EUR €)
  • Malawi (MWK MK)
  • Malaysia (MYR RM)
  • Maldives (MVR MVR)
  • Mali (XOF Fr)
  • Malta (EUR €)
  • Martinique (EUR €)
  • Mauritania (EUR €)
  • Mauritius (MUR ₨)
  • Mayotte (EUR €)
  • Mexico (EUR €)
  • Moldova (MDL L)
  • Monaco (EUR €)
  • Mongolia (MNT ₮)
  • Montenegro (EUR €)
  • Montserrat (XCD $)
  • Morocco (MAD د.م.)
  • Mozambique (EUR €)
  • Myanmar (Burma) (MMK K)
  • Namibia (EUR €)
  • Nauru (AUD $)
  • Nepal (NPR Rs.)
  • Netherlands (EUR €)
  • New Caledonia (XPF Fr)
  • New Zealand (NZD $)
  • Nicaragua (NIO C$)
  • Niger (XOF Fr)
  • Nigeria (NGN ₦)
  • Niue (NZD $)
  • Norfolk Island (AUD $)
  • North Macedonia (MKD ден)
  • Norway (EUR €)
  • Oman (EUR €)
  • Pakistan (PKR ₨)
  • Palestinian Territories (ILS ₪)
  • Panama (USD $)
  • Papua New Guinea (PGK K)
  • Paraguay (PYG ₲)
  • Peru (PEN S/)
  • Philippines (PHP ₱)
  • Pitcairn Islands (NZD $)
  • Poland (PLN zł)
  • Portugal (EUR €)
  • Qatar (QAR ر.ق)
  • Réunion (EUR €)
  • Romania (RON Lei)
  • Russia (EUR €)
  • Rwanda (RWF FRw)
  • Samoa (WST T)
  • San Marino (EUR €)
  • São Tomé & Príncipe (STD Db)
  • Saudi Arabia (SAR ر.س)
  • Senegal (XOF Fr)
  • Serbia (RSD РСД)
  • Seychelles (EUR €)
  • Sierra Leone (SLL Le)
  • Singapore (SGD $)
  • Sint Maarten (ANG ƒ)
  • Slovakia (EUR €)
  • Slovenia (EUR €)
  • Solomon Islands (SBD $)
  • Somalia (EUR €)
  • South Africa (EUR €)
  • South Georgia & South Sandwich Islands (GBP £)
  • South Korea (KRW ₩)
  • South Sudan (EUR €)
  • Spain (EUR €)
  • Sri Lanka (LKR ₨)
  • St. Barthélemy (EUR €)
  • St. Helena (SHP £)
  • St. Kitts & Nevis (XCD $)
  • St. Lucia (XCD $)
  • St. Martin (EUR €)
  • St. Pierre & Miquelon (EUR €)
  • St. Vincent & Grenadines (XCD $)
  • Sudan (EUR €)
  • Suriname (EUR €)
  • Svalbard & Jan Mayen (EUR €)
  • Sweden (SEK kr)
  • Switzerland (CHF CHF)
  • Taiwan (TWD $)
  • Tajikistan (TJS ЅМ)
  • Tanzania (TZS Sh)
  • Thailand (THB ฿)
  • Timor-Leste (USD $)
  • Togo (XOF Fr)
  • Tokelau (NZD $)
  • Tonga (TOP T$)
  • Trinidad & Tobago (TTD $)
  • Tristan da Cunha (GBP £)
  • Tunisia (EUR €)
  • Türkiye (EUR €)
  • Turkmenistan (EUR €)
  • Turks & Caicos Islands (USD $)
  • Tuvalu (AUD $)
  • U.S. Outlying Islands (USD $)
  • Uganda (UGX USh)
  • Ukraine (UAH ₴)
  • United Arab Emirates (AED د.إ)
  • United Kingdom (GBP £)
  • United States (USD $)
  • Uruguay (UYU $U)
  • Uzbekistan (UZS so'm)
  • Vanuatu (VUV Vt)
  • Vatican City (EUR €)
  • Venezuela (USD $)
  • Vietnam (VND ₫)
  • Wallis & Futuna (XPF Fr)
  • Western Sahara (MAD د.م.)
  • Yemen (YER ﷼)
  • Zambia (EUR €)
  • Zimbabwe (USD $)

Falcon Travelers

  • Home
  • Leather Covers
    • Original Leather
      • Travelers, Original
      • Folio, Original
      • Ringbound, Original
      • Portfolio, Original
      • Device Covers
    • Peregrine leather
      • Travelers, Peregrine
      • Folio, Peregrine
    • Customize your Notebook
      • Configuration
      • Tooling
      • Engraving
      • Painting and Distressing
      • Inking and Airbrushing
    • Workshops
    • Leather Samples
  • Inserts and more
    • Bags and Satchels
    • Paper Inserts
      • Planners
      • Bullet Journals
      • Journals
      • Undated Trackers
      • Folders
      • Ringbound Inserts
    • Leather Inserts
    • Leather Pen Case
    • Small Leather Goods
      • All
      • Bracelets
      • Coasters
      • Key-Fobs
      • Notebook Accessories
      • Patches and Labels
      • Tabs
      • Wallets
    • Small Goods
    • Gift Cards
  • Info
    • FAQ
      • How to order
      • FAQ
      • Leather
      • Dyes
      • Painting
    • About us
      • About us
      • Blog
      • Contact us
      • Policies
    • Gallery
    • Order Status
    • Workshops
0
Login
  • Home
  • Leather Covers
    • Original Leather
      • Travelers, Original
      • Folio, Original
      • Ringbound, Original
      • Portfolio, Original
      • Device Covers
    • Peregrine leather
      • Travelers, Peregrine
      • Folio, Peregrine
    • Customize your Notebook
      • Configuration
      • Tooling
      • Engraving
      • Painting and Distressing
      • Inking and Airbrushing
    • Workshops
    • Leather Samples
  • Inserts and more
    • Bags and Satchels
    • Paper Inserts
      • Planners
      • Bullet Journals
      • Journals
      • Undated Trackers
      • Folders
      • Ringbound Inserts
    • Leather Inserts
    • Leather Pen Case
    • Small Leather Goods
      • All
      • Bracelets
      • Coasters
      • Key-Fobs
      • Notebook Accessories
      • Patches and Labels
      • Tabs
      • Wallets
    • Small Goods
    • Gift Cards
  • Info
    • FAQ
      • How to order
      • FAQ
      • Leather
      • Dyes
      • Painting
    • About us
      • About us
      • Blog
      • Contact us
      • Policies
    • Gallery
    • Order Status
    • Workshops

Country

  • Afghanistan (AFN ؋)
  • Åland Islands (EUR €)
  • Albania (ALL L)
  • Algeria (DZD د.ج)
  • Andorra (EUR €)
  • Angola (EUR €)
  • Anguilla (XCD $)
  • Antigua & Barbuda (XCD $)
  • Argentina (EUR €)
  • Armenia (AMD դր.)
  • Aruba (AWG ƒ)
  • Ascension Island (SHP £)
  • Australia (AUD $)
  • Austria (EUR €)
  • Azerbaijan (AZN ₼)
  • Bahamas (BSD $)
  • Bahrain (EUR €)
  • Bangladesh (BDT ৳)
  • Barbados (BBD $)
  • Belarus (EUR €)
  • Belgium (EUR €)
  • Belize (BZD $)
  • Benin (XOF Fr)
  • Bermuda (USD $)
  • Bhutan (EUR €)
  • Bolivia (BOB Bs.)
  • Bosnia & Herzegovina (BAM КМ)
  • Botswana (BWP P)
  • Brazil (EUR €)
  • British Indian Ocean Territory (USD $)
  • British Virgin Islands (USD $)
  • Brunei (BND $)
  • Bulgaria (BGN лв.)
  • Burkina Faso (XOF Fr)
  • Burundi (BIF Fr)
  • Cambodia (KHR ៛)
  • Cameroon (XAF CFA)
  • Canada (CAD $)
  • Cape Verde (CVE $)
  • Caribbean Netherlands (USD $)
  • Cayman Islands (KYD $)
  • Central African Republic (XAF CFA)
  • Chad (XAF CFA)
  • Chile (EUR €)
  • China (CNY ¥)
  • Christmas Island (AUD $)
  • Cocos (Keeling) Islands (AUD $)
  • Colombia (EUR €)
  • Comoros (KMF Fr)
  • Congo - Brazzaville (XAF CFA)
  • Congo - Kinshasa (CDF Fr)
  • Cook Islands (NZD $)
  • Costa Rica (CRC ₡)
  • Côte d’Ivoire (XOF Fr)
  • Croatia (EUR €)
  • Curaçao (ANG ƒ)
  • Cyprus (EUR €)
  • Czechia (CZK Kč)
  • Denmark (DKK kr.)
  • Djibouti (DJF Fdj)
  • Dominica (XCD $)
  • Dominican Republic (DOP $)
  • Ecuador (USD $)
  • Egypt (EGP ج.م)
  • El Salvador (USD $)
  • Equatorial Guinea (XAF CFA)
  • Eritrea (EUR €)
  • Estonia (EUR €)
  • Eswatini (EUR €)
  • Ethiopia (ETB Br)
  • Falkland Islands (FKP £)
  • Faroe Islands (DKK kr.)
  • Fiji (FJD $)
  • Finland (EUR €)
  • France (EUR €)
  • French Guiana (EUR €)
  • French Polynesia (XPF Fr)
  • French Southern Territories (EUR €)
  • Gabon (XOF Fr)
  • Gambia (GMD D)
  • Georgia (EUR €)
  • Germany (EUR €)
  • Ghana (EUR €)
  • Gibraltar (GBP £)
  • Greece (EUR €)
  • Greenland (DKK kr.)
  • Grenada (XCD $)
  • Guadeloupe (EUR €)
  • Guatemala (GTQ Q)
  • Guernsey (GBP £)
  • Guinea (GNF Fr)
  • Guinea-Bissau (XOF Fr)
  • Guyana (GYD $)
  • Haiti (EUR €)
  • Honduras (HNL L)
  • Hong Kong SAR (HKD $)
  • Hungary (HUF Ft)
  • Iceland (ISK kr)
  • India (INR ₹)
  • Indonesia (IDR Rp)
  • Iraq (EUR €)
  • Ireland (EUR €)
  • Isle of Man (GBP £)
  • Israel (ILS ₪)
  • Italy (EUR €)
  • Jamaica (JMD $)
  • Japan (JPY ¥)
  • Jersey (EUR €)
  • Jordan (EUR €)
  • Kazakhstan (KZT ₸)
  • Kenya (KES KSh)
  • Kiribati (EUR €)
  • Kosovo (EUR €)
  • Kuwait (EUR €)
  • Kyrgyzstan (KGS som)
  • Laos (LAK ₭)
  • Latvia (EUR €)
  • Lebanon (LBP ل.ل)
  • Lesotho (EUR €)
  • Liberia (EUR €)
  • Libya (EUR €)
  • Liechtenstein (CHF CHF)
  • Lithuania (EUR €)
  • Luxembourg (EUR €)
  • Macao SAR (MOP P)
  • Madagascar (EUR €)
  • Malawi (MWK MK)
  • Malaysia (MYR RM)
  • Maldives (MVR MVR)
  • Mali (XOF Fr)
  • Malta (EUR €)
  • Martinique (EUR €)
  • Mauritania (EUR €)
  • Mauritius (MUR ₨)
  • Mayotte (EUR €)
  • Mexico (EUR €)
  • Moldova (MDL L)
  • Monaco (EUR €)
  • Mongolia (MNT ₮)
  • Montenegro (EUR €)
  • Montserrat (XCD $)
  • Morocco (MAD د.م.)
  • Mozambique (EUR €)
  • Myanmar (Burma) (MMK K)
  • Namibia (EUR €)
  • Nauru (AUD $)
  • Nepal (NPR Rs.)
  • Netherlands (EUR €)
  • New Caledonia (XPF Fr)
  • New Zealand (NZD $)
  • Nicaragua (NIO C$)
  • Niger (XOF Fr)
  • Nigeria (NGN ₦)
  • Niue (NZD $)
  • Norfolk Island (AUD $)
  • North Macedonia (MKD ден)
  • Norway (EUR €)
  • Oman (EUR €)
  • Pakistan (PKR ₨)
  • Palestinian Territories (ILS ₪)
  • Panama (USD $)
  • Papua New Guinea (PGK K)
  • Paraguay (PYG ₲)
  • Peru (PEN S/)
  • Philippines (PHP ₱)
  • Pitcairn Islands (NZD $)
  • Poland (PLN zł)
  • Portugal (EUR €)
  • Qatar (QAR ر.ق)
  • Réunion (EUR €)
  • Romania (RON Lei)
  • Russia (EUR €)
  • Rwanda (RWF FRw)
  • Samoa (WST T)
  • San Marino (EUR €)
  • São Tomé & Príncipe (STD Db)
  • Saudi Arabia (SAR ر.س)
  • Senegal (XOF Fr)
  • Serbia (RSD РСД)
  • Seychelles (EUR €)
  • Sierra Leone (SLL Le)
  • Singapore (SGD $)
  • Sint Maarten (ANG ƒ)
  • Slovakia (EUR €)
  • Slovenia (EUR €)
  • Solomon Islands (SBD $)
  • Somalia (EUR €)
  • South Africa (EUR €)
  • South Georgia & South Sandwich Islands (GBP £)
  • South Korea (KRW ₩)
  • South Sudan (EUR €)
  • Spain (EUR €)
  • Sri Lanka (LKR ₨)
  • St. Barthélemy (EUR €)
  • St. Helena (SHP £)
  • St. Kitts & Nevis (XCD $)
  • St. Lucia (XCD $)
  • St. Martin (EUR €)
  • St. Pierre & Miquelon (EUR €)
  • St. Vincent & Grenadines (XCD $)
  • Sudan (EUR €)
  • Suriname (EUR €)
  • Svalbard & Jan Mayen (EUR €)
  • Sweden (SEK kr)
  • Switzerland (CHF CHF)
  • Taiwan (TWD $)
  • Tajikistan (TJS ЅМ)
  • Tanzania (TZS Sh)
  • Thailand (THB ฿)
  • Timor-Leste (USD $)
  • Togo (XOF Fr)
  • Tokelau (NZD $)
  • Tonga (TOP T$)
  • Trinidad & Tobago (TTD $)
  • Tristan da Cunha (GBP £)
  • Tunisia (EUR €)
  • Türkiye (EUR €)
  • Turkmenistan (EUR €)
  • Turks & Caicos Islands (USD $)
  • Tuvalu (AUD $)
  • U.S. Outlying Islands (USD $)
  • Uganda (UGX USh)
  • Ukraine (UAH ₴)
  • United Arab Emirates (AED د.إ)
  • United Kingdom (GBP £)
  • United States (USD $)
  • Uruguay (UYU $U)
  • Uzbekistan (UZS so'm)
  • Vanuatu (VUV Vt)
  • Vatican City (EUR €)
  • Venezuela (USD $)
  • Vietnam (VND ₫)
  • Wallis & Futuna (XPF Fr)
  • Western Sahara (MAD د.م.)
  • Yemen (YER ﷼)
  • Zambia (EUR €)
  • Zimbabwe (USD $)
Home Lady Falcon Travelers tutorials

Lady Falcon Travelers

How to make bookmarks

How to make bookmarks

July 09, 2017

For the past 4 years I've been using my leather tipped bookmarks in my Traveler's notebook inserts. Many people have asked me if I would make and sell them for the shop.

DSC02677.JPG

Unfortunately I have not yet found a way to make these with a consistent look yet. I make them entirely by hand, which makes these slightly different each time. I think that is fine and even part of the fun for my personal use, but I somehow don't feel comfortable enough about that to make them for the shop. 

I have made and sold a few before, but they are not available in the shop and I have decided after a lot of hard thought not to list them in the shop. Who knows maybe I'll change my mind in the future.

However they are fairly simple to make yourselves. All you need is cardstock, some scraps of leather, a corner rounder (or a jeans button to cut around), a sharp blade, a metal ruler and glue (white PVA glue will do just fine, any flexible glue will).

DSC02671

To use these kinds of bookmarks the way I do your inserts need to be sewn with a 3 point pamphlet stitch. so you can slide the bookmark between the pages.

You cut strips from the cardstock at about 3 cm wide and fold them so that one part of the strip has the same length as the width of your insert.

I suggest cutting the other part to about 5 cm (2 ") , but you can make it any length you like. Just not too short, since we need that to slide under the pages.

DSC02672

You also need 2 pieces of leather per bookmark you are making. You cut the leather to the width of the cardstock. I tend to make them square, but you can have them any way you like. These here are 3-3 cm (1.18"). You round the corners on 1 side of the leather, either with a corner rounder (one that cuts leather) or by putting the jeans button on the corner and carefully slicing around it with your sharp blade.

DSC02673

You also round the corners on your cardstock pieces. I prefer them to be 1/4".

The next step is to glue the leather pieces to the cardstock with the white PVA glue (some prefer e6000, but that's not really necessary).

DSC02666.JPG

make sure the glue is evenly distributed on the leather and glue them to the longest side of your bookmark. Making sure a tiny bit sticks out at the top.

DSC02667.JPG

The more you let it stick out the more your tab will stick out from the side of your insert. No need to make this bit very large, since the bookmark will slide under the pages, it'll stick out up to half a cm already.

DSC02669.JPG

Now you can glue the second piece on top of that and you will have created your bookmark. Let it dry for a bit, but I find I can usually use them right away.

DSC02674.JPG

While you're at it, you can make a few extra =)

You can leave them like this and insert them between the pages of your inserts.

DSC02678.JPG

Or decorate them to your hearts content, like I did with the ones below.

dsc05607

Use stamping, washi, or anything that you think would look cute.

To make them more durable, you can tape them with packing tape before you glue the leather to the tabs. I found that the leather stays perfectly on the packing taped bookmarks, so no need to worry that they will come off. And should they do, you can always glue them back onto the bookmark.

DSC02676.JPG

I always carry an extra with me, just in case I want to add a second to my insert. Another tip I have is to have a paper clip or magnetic clip at hand for when you reach the middle of the insert. In the middle there are obviously no pages to slide the bookmark under, so I use the clip to attach the bookmark to the elastics. Often I keep a magnetic clip on my bookmark, because I think it looks cute.

I hope you found this useful. Have fun making your bookmarks and if you have any questions, don't hesitate to leave them in the comments.

Have a wonderful week,

xoxo Monique

Continue reading

How many inserts can my Traveler's Notebook hold...

January 02, 2016 3 Comments

I get that question a lot: How many inserts does your Traveler's Notebook hold. Specially when talking about a Regular sized Traveler. I always feel a little lost with this question, because I know there is no straight forward answer. It all depends on the thickness of the inserts. That's why I thought I would write a blog post about it and try to show you what I mean. I do have a standard respons, because generally speaking this is what it comes down to. However it all depends on the inserts. I Usually say, my Regular Size (RS) cover allows for 3-4 inserts, that's booklets, folders and such and my XL RS, being 20 mm wider, will allow for 6-8 inserts. However, like I said, it all depends on the inserts, not all inserts are the same. You have your folders, plastic zipper pouches, leather wallet inserts and booklets. DSC06364 Now most things are fairly straight forward and it is clear that a folder will get thicker when you put stuff in it and so does a zipper pouch. A leather insert has a thickness of it's own and mostly that seems to be clear. It's the booklets that cause the confusion. Not all booklets are equal...there's even a difference between a booklet that hasn't been written in and one that is full. This is something you should take into account when looking for inserts. Also my inserts, the Falcon Files, are about 60 pages. Looking around on Etsy and elsewhere, I have found most inserts are about 40 pages. Fieldnotes booklets are 48 pages. Midori inserts and Moleskine cahiers have about the same number of pages as my Falcon Files. This all makes it difficult to compare. So I'm not going to do that, I'm just going to give you a real life example. My own Regular size Traveler. This is my Little red Dragon, my journaling TN at the end of December 2015 and all inserts are full. I have a leather wallet insert, DSC06357 A Midori Plastic zipper pouch, with stuff, DSC06358 A journaling insert, the Arrows dot-grid free Falcon File printable, this one is completely full, DSC06359 A folder with pen-loops, decorated as time passed and with stuff...stickers, bills etc. DSC06360 My miscellaneous booklet, been with me since march 2015, half full, DSC06361 And to show that it really is a wallet that wraps around the inserts, here's the back, with bits and bobs in it. DSC06362 
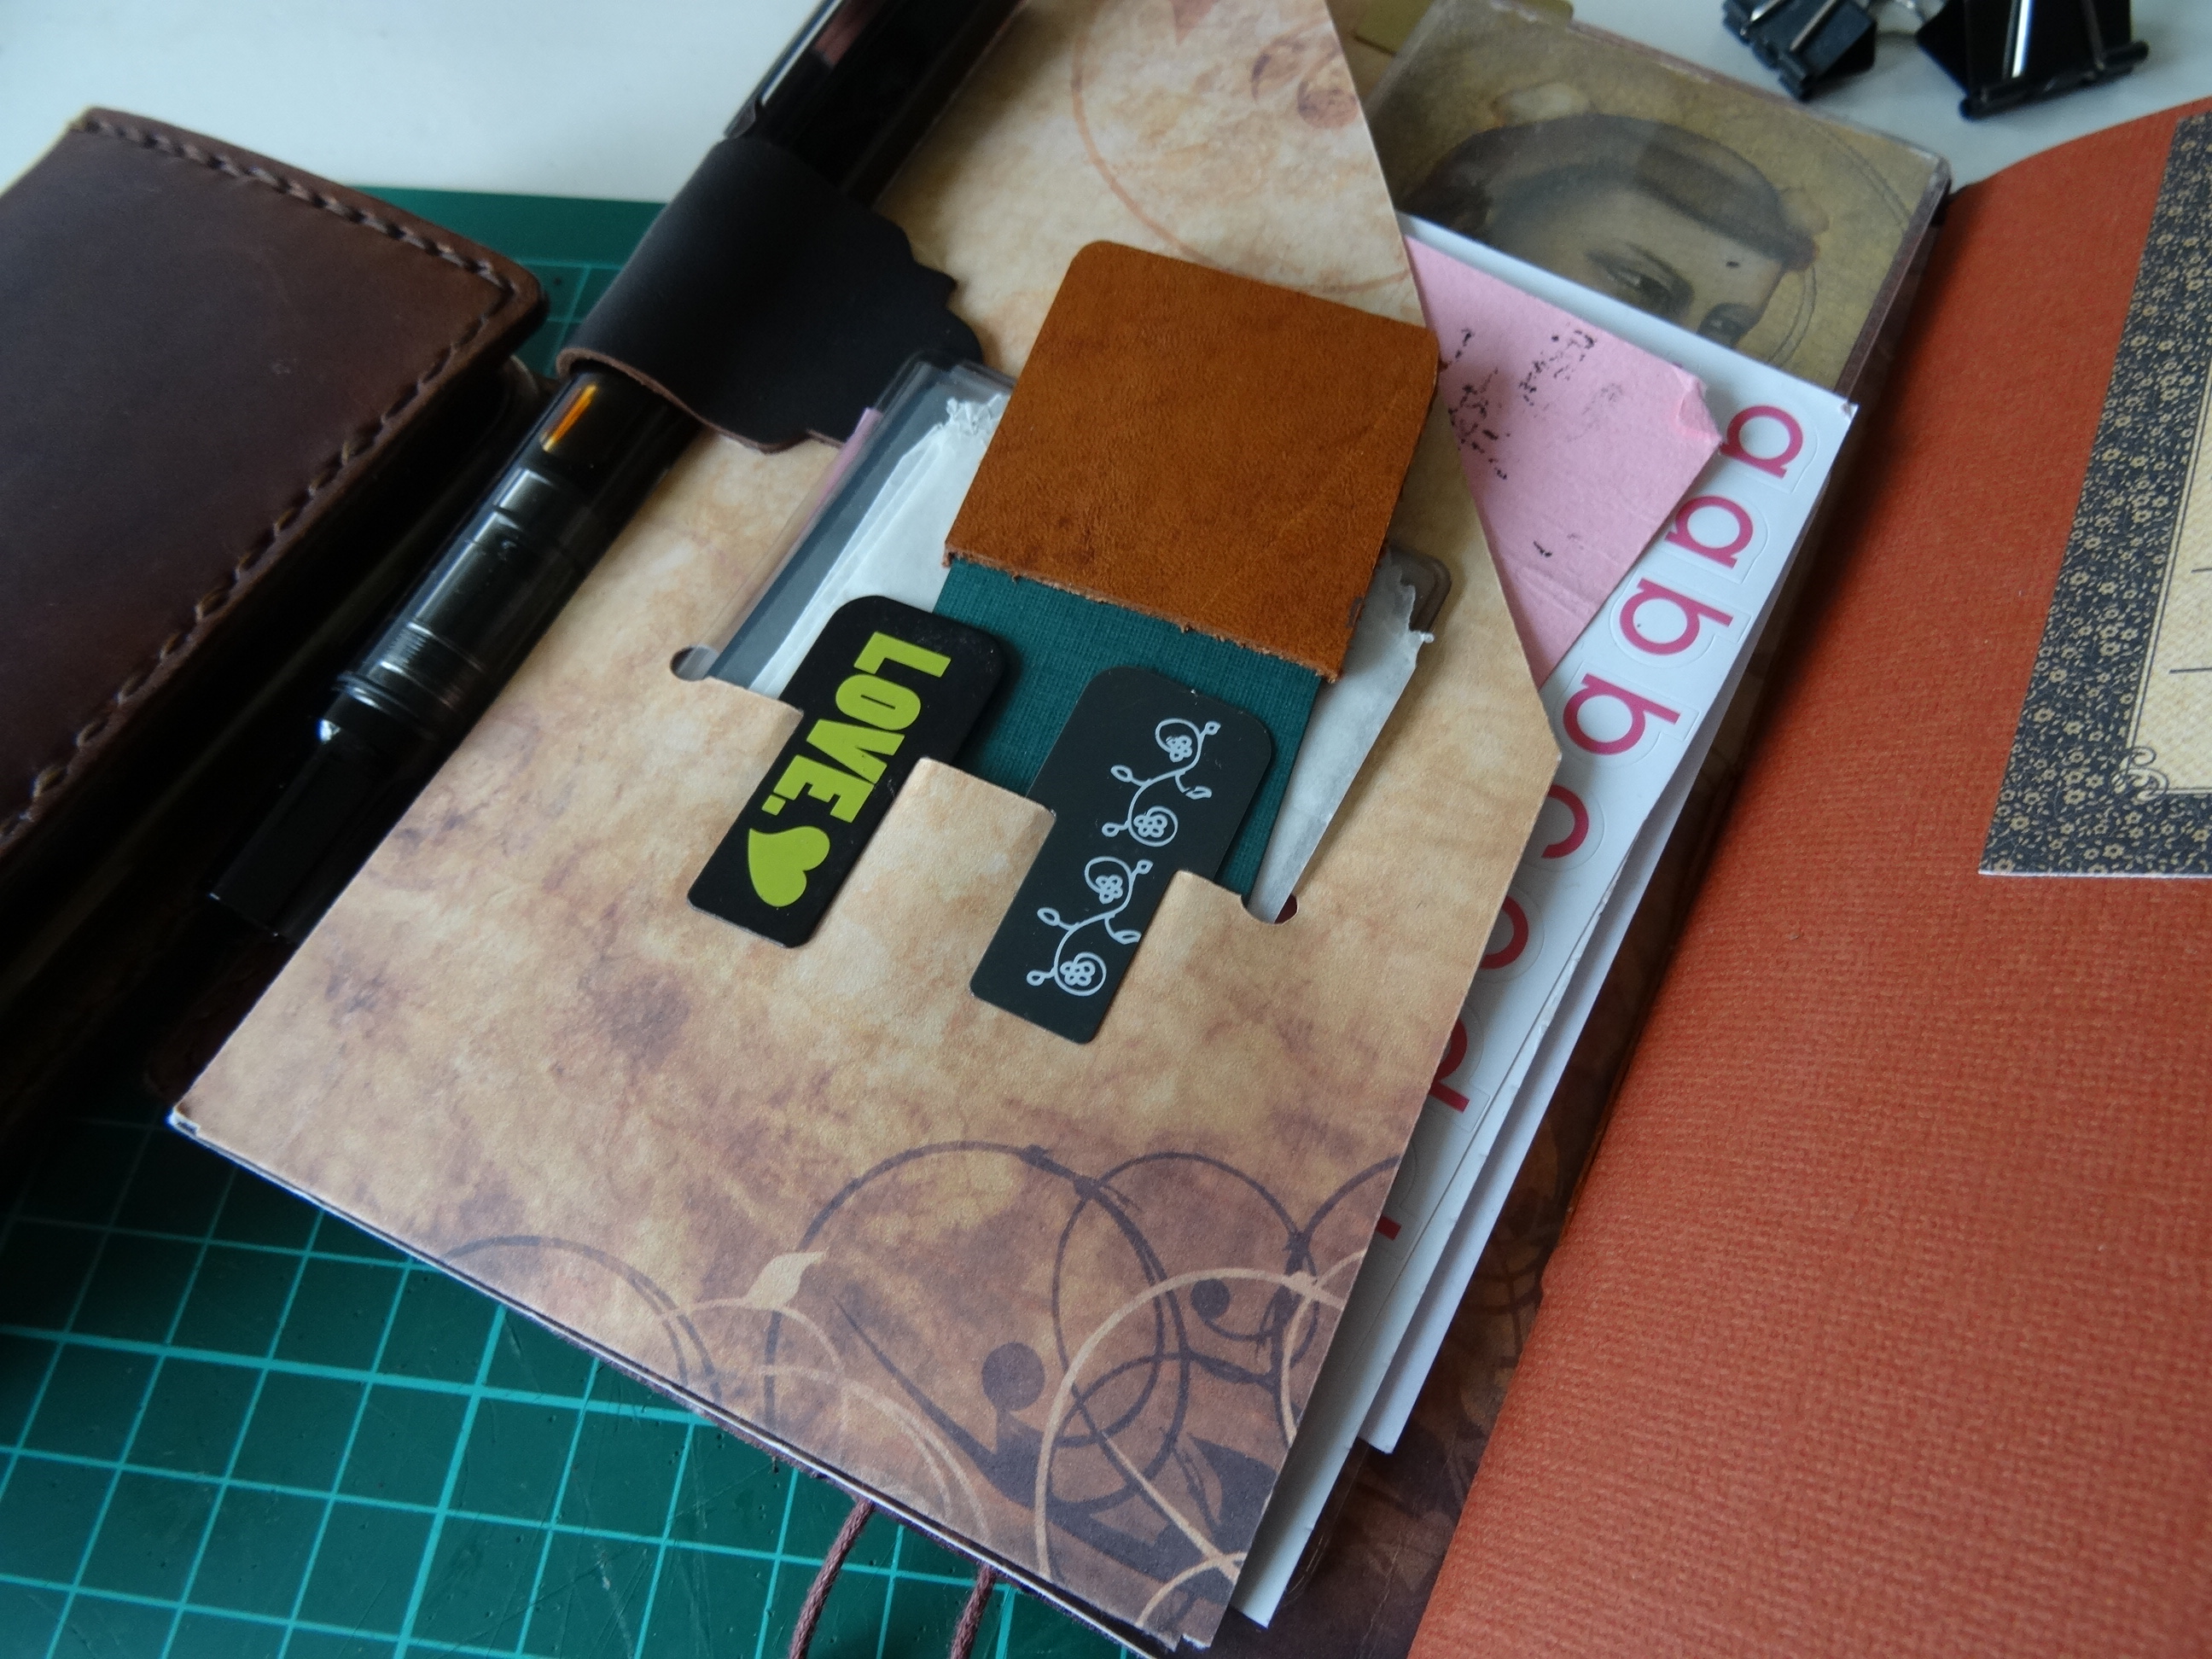
I'm counting 5 inserts in this Traveler. making it rather full, but I still feel it is doable. I've got no inserts sticking out at the end and I can still hold it with one hand. Any more however would not do. Not with these inserts and not when they are full. As you can see in the below picture, a full insert can get rather bigger. DSC06367 
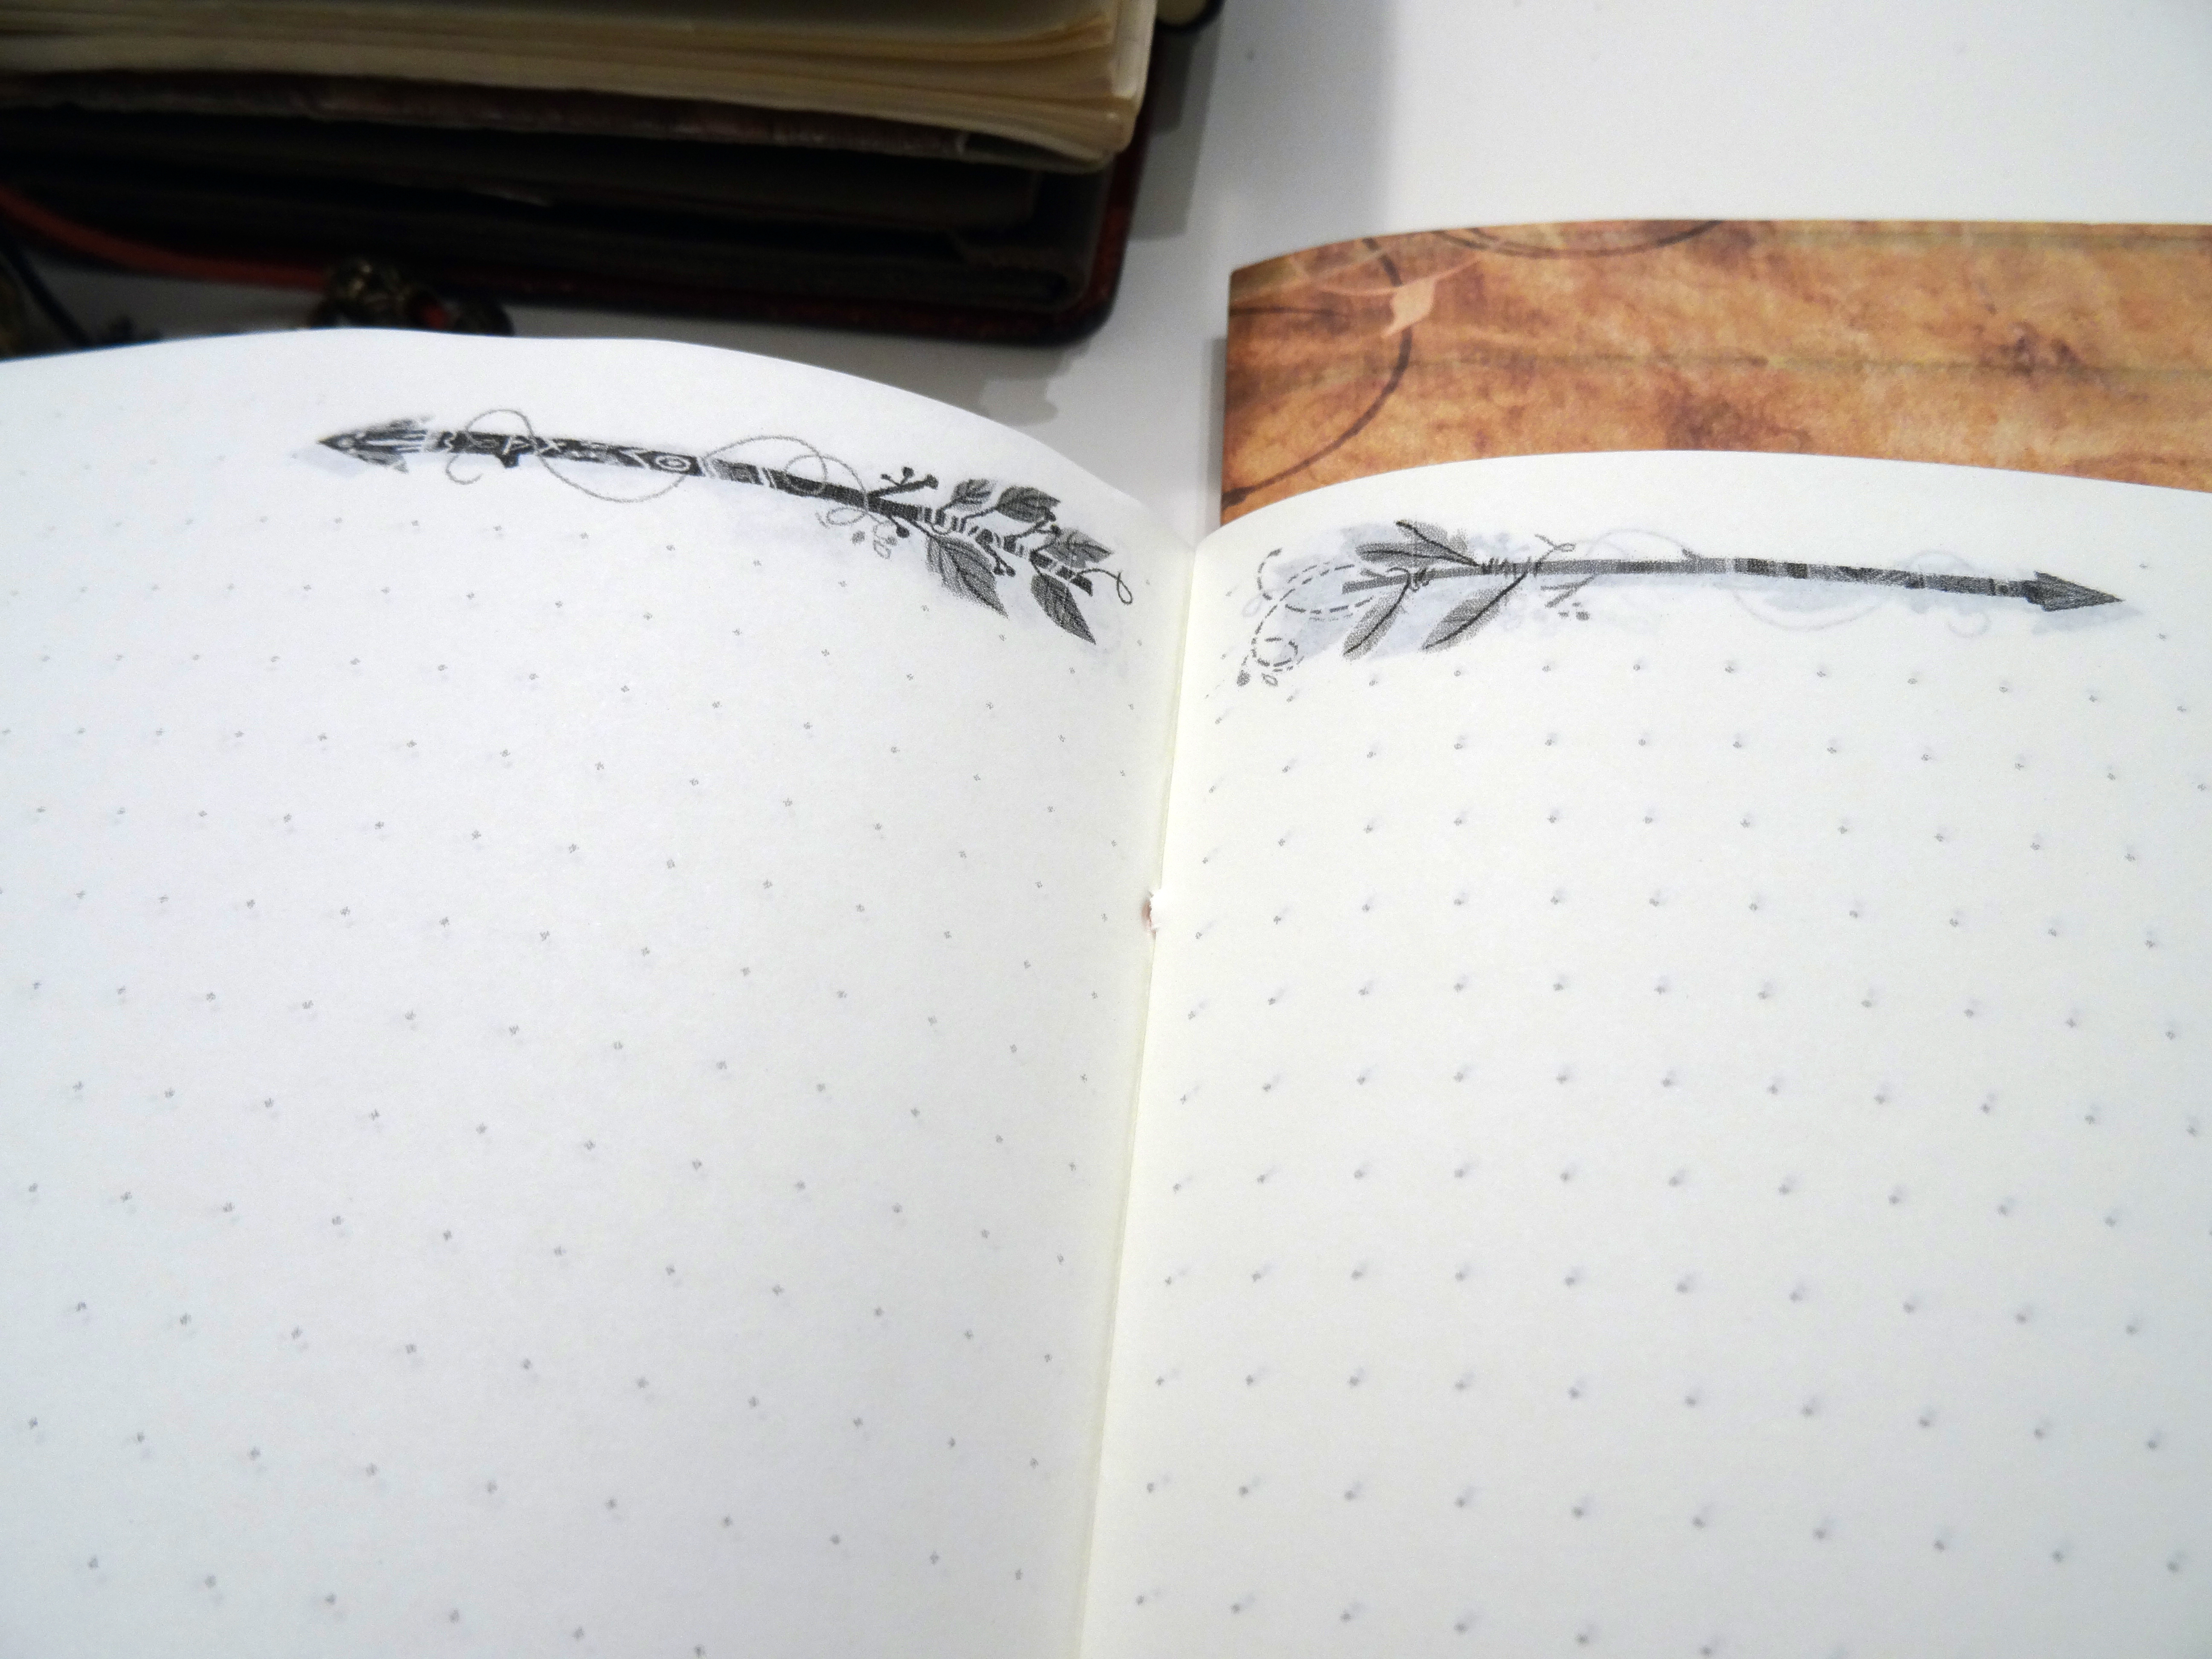
This isn't even an insert with lots of photo's and ephemera added in. In the picture below you can see 2 new unwritten inserts. Both have the same amount of pages and both are new, however the middle one is made with Tomoe River Paper. The Tomoe River paper is thinner, making for a thinner booklet. DSC06369 Now since I want to start using the Little Red Dragon as a planner again and keep the personal size as a wallet plus bullet journal, I made 3 new inserts all from Tomoe River paper and added them to the Traveler. Measuring again, these three new inserts replacing the 2 previous inserts now give me a 5 cm high stack...1 cm less then it was before. DSC06383 
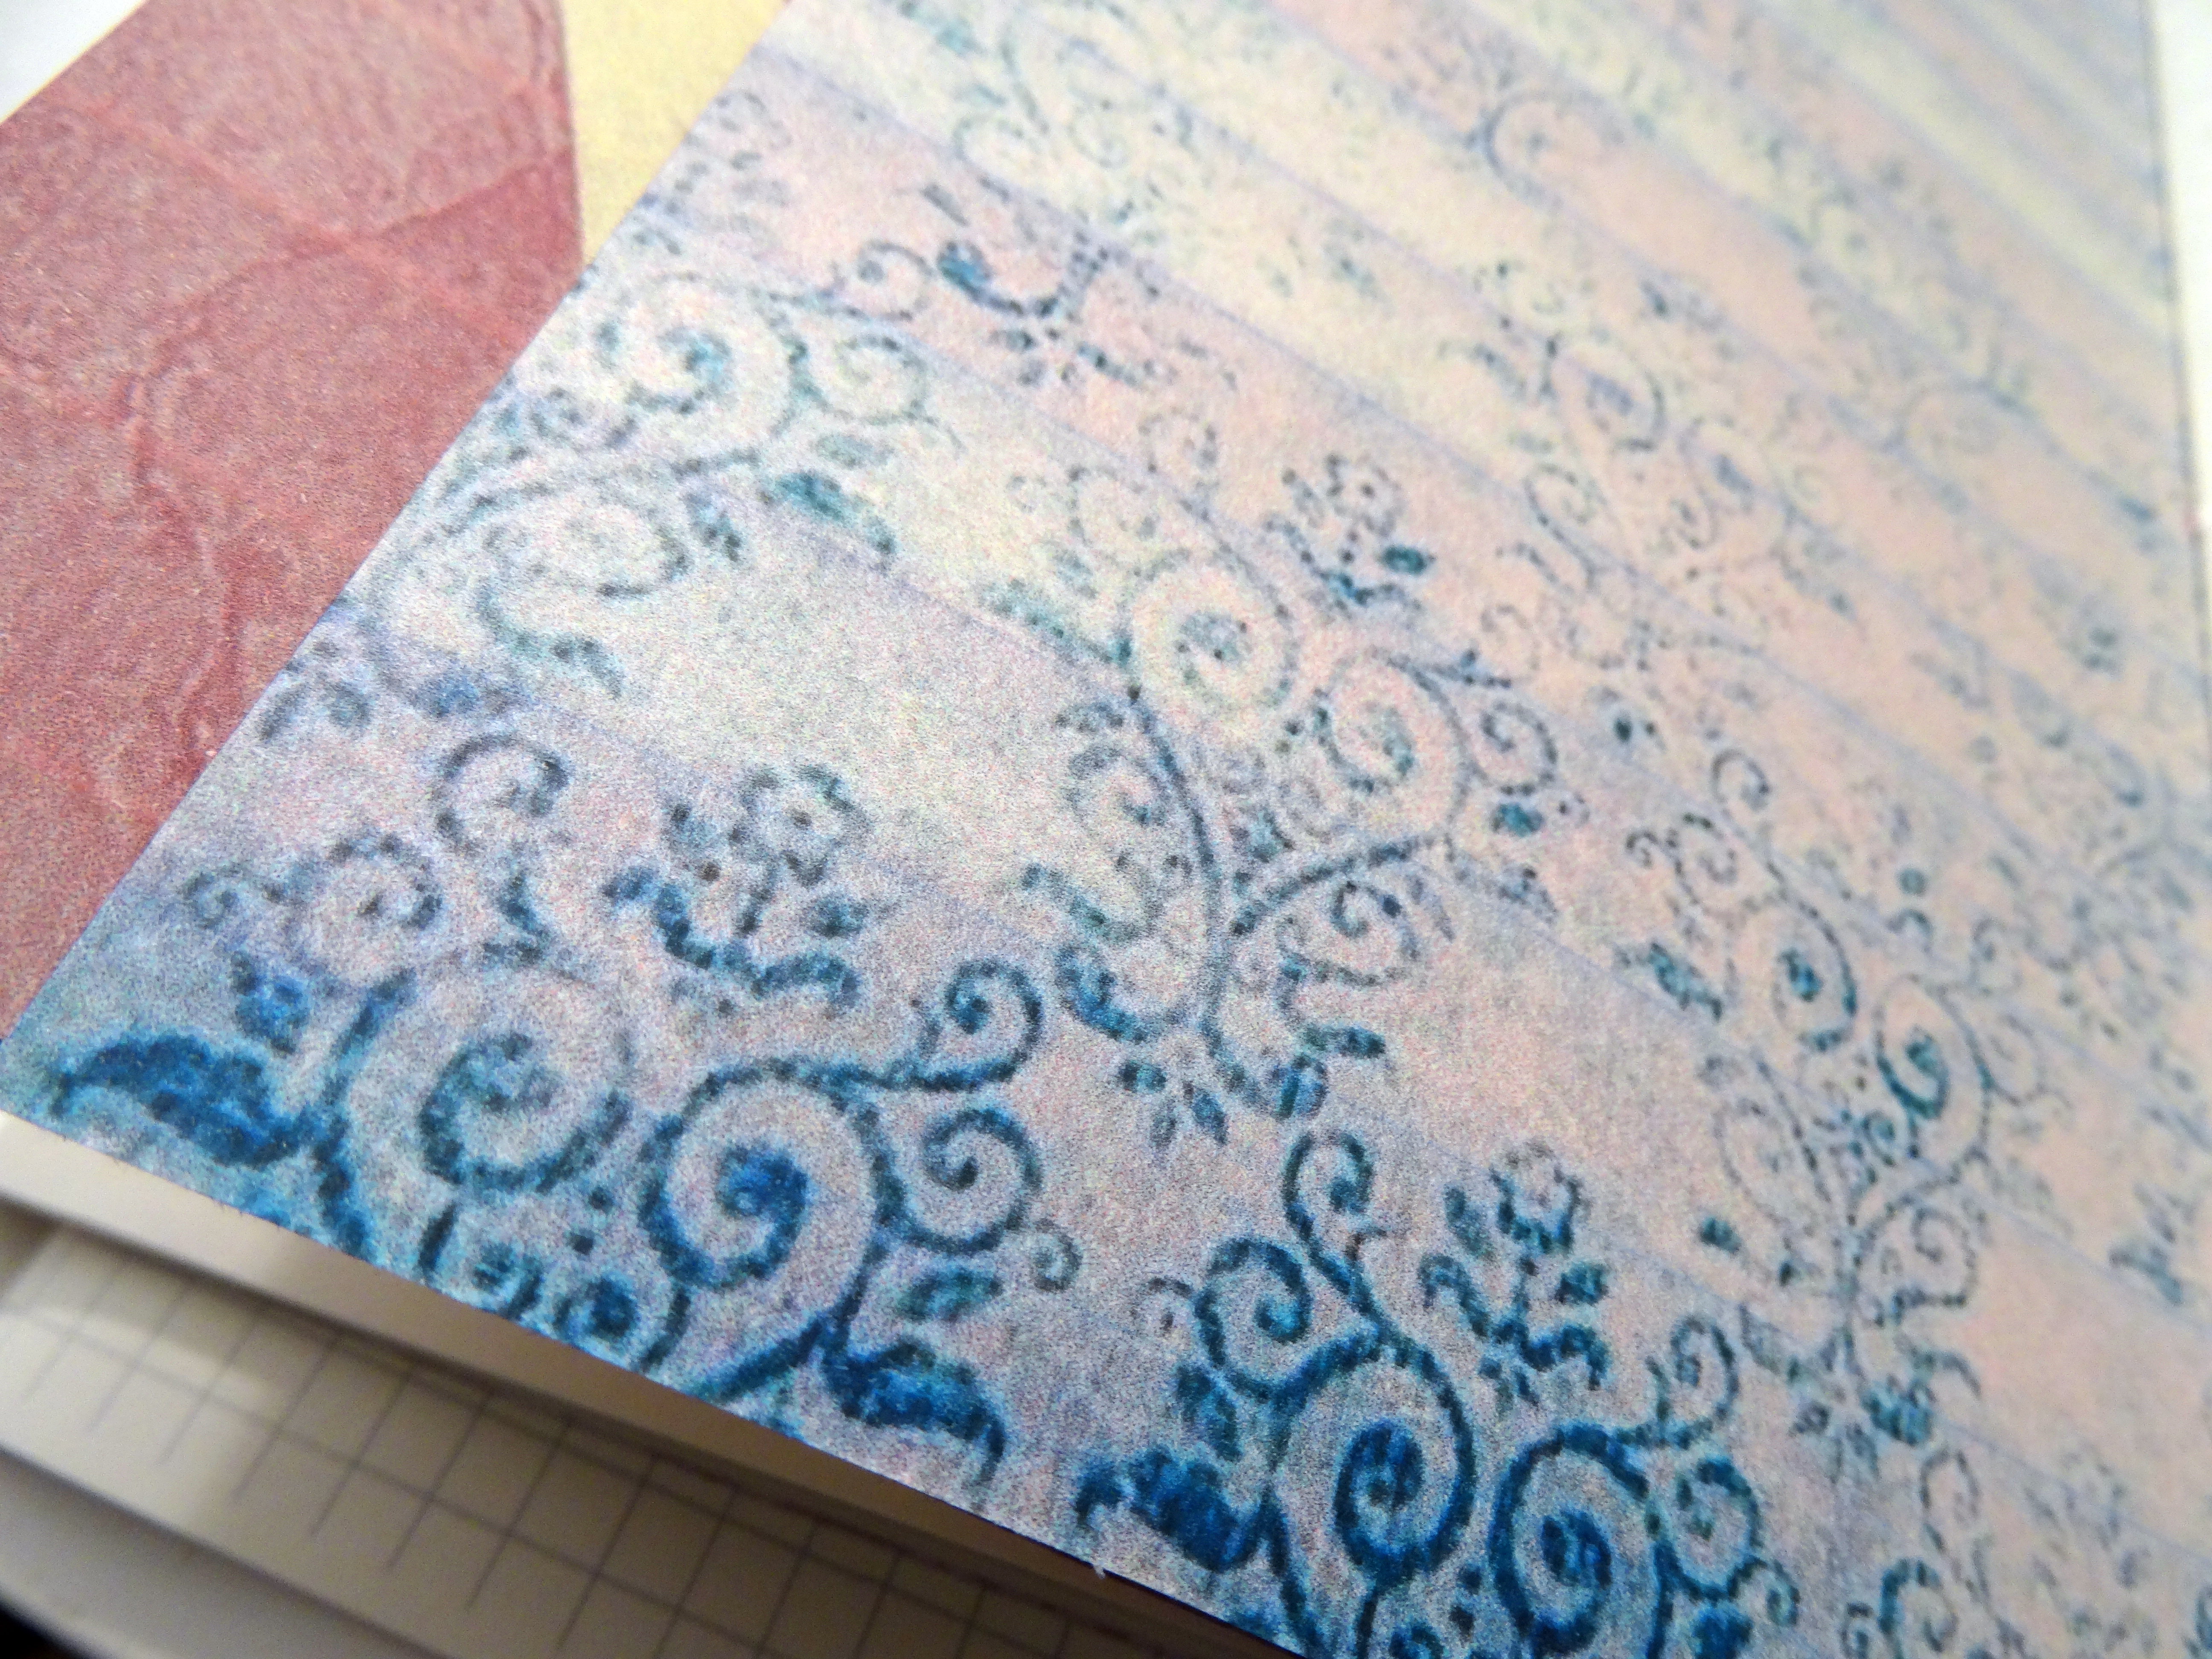
Now I know with use this will grow again, but for now I'm fine with this. Below you see the new inserts I added. DSC06375 I have to blame Janet for the angels, but I'm pretty chuffed with these covers. DSC06376 The first insert is a modern style MOTP-WOTP combination diary, which is 72 pages. DSC06377 The second is a dot-grid journaling insert, with 60 pages. DSC06378 Followed by the Miscellaneous insert for this year, 64 pages. DSC06379 With birthdays, DSC06380 a Password Tracker DSC06381 conversion tables, a menu planner and an index listing in the back DSC06382 I hope you see what I mean, when I say, there is no simple answer to that simple question. I can say 3-4 inserts, like most do and yes, that would be true....depending on the inserts...and depending on how you plan to use them. I know I will probably be best off with 2 booklets max, or perhaps now, with the Tomoe River paper, 3 max...however those are 5-6 inserts and not 2-3.   I hope you found this informative. Have a wonderful weekend and a fabulous 2016! xx Monique  

Continue reading

Painted leather Traveler's Notebook covers, on the outside....

May 27, 2015 2 Comments

Or...why I don't paint the inside of my covers with the same acrylics based leather dyes I use on the smooth outside.

I've gotten a few questions from people asking me if I could paint the inside of the leather Traveler's Notebook covers. The answer to that would have to be yes, of course I can paint the inside of the covers, however I choose not to do it. For a reason, a very good reason in my mind. =)

I do dye the insides of the covers with alcohol or oil based leather dyes. So there's plenty of color to be had ...


for instance, the above Nebula Traveler's Notebook, has a purple inside =)

To explain why I choose not to paint the inside, I would first have to explain something about the vegetable tanned leather I use.
The vegetable tanned saddle leather I use is 2.5 mm thick (6-6.5 oz). A cow hide is not uniformly thick, so to get the full grain leather with this thickness, the hides are split. The outside is the full grain outer skin. The inside, where the cut was made, has a rougher suede like appearance. With the tanning process these loose fibers get pressed down and it will look slightly flattish at first, but with time the fibers will loosen again.

Not all insides have the same length fibers, some are very short and some are fairly long...
Now if you dye this with acrylic leather paint and/or finisher, you will flatten the fibers at first. Depending on the type of finisher you use the fibers will stay down quite a while.

However in the end, and probably sooner rather then later, due to the nature of the use the notebook gets, ....folding it open and close repeatedly, ....these fibers will work themselves loose again. revealing the undyed natural leather color.


As an example I have here, my very first home made leather Traveler's Notebook. It was my daily carry for about a year and is still going strong, even though I did replace it a year ago with another black Traveler's Notebook...


As you can see, I do use these notebooks, so they look a bit scruffy from getting logged around all the time. Both have had about a years worth of daily abuse by now, so I think it is fair to compare them.

The first was dyed with an acrylic base dye and finisher, both inside and out and the second with an oil based (fiebings) leather dye.


The notebook on the left is showing some wear on the edges, where the dye has gone, showing the natural color of the leather. The right notebook doesn't have this at all. The dye doesn't lie on the surface, but has sunken into the leather. Other then some wear on the edges, with the acrylic based dye, you can see the dye is holding great!

On the inside however, this is a different story.


As you can see, the fibers are loosening and showing the natural color of the leather.


Which is not a problem and does nothing to the integrity of the leather, but when you have a pretty painting on the inside...it'll get all chipped and strange looking... which is also ok, if you don't mind that =)


With the alcohol or oil based dyes I use for the inside, this won't happen. After dyeing I brush them with a suede brush to get a nice and soft suede feeling surface.

You can still get different colors for the outside and inside.


and the outside can be painted, while still having the nice and soft interior.

I hope this helped explain this all a bit.
If you like to see more Traveler's Notebooks and or inserts you can follow me here:
Facebook Group: Lady Falcon Traveler's Notebooks
Facebook page: Morgan Le Fae's Trinkets
IG: LadyFalconTN
Flickr: Traveler's Notebooks
Etsy: MorganLeFaesTrinkets

Continue reading

A6, Fieldnotes/Pocket or Passport booklet making tutorial

February 05, 2015 3 Comments

Just a quick post today, with a video tutorial I made about printing and making A6, Fieldnotes (Pocket), Passport sized booklets when you onlu have A4 sized paper. I don't think this will work with letter sized paper, because the dimensions and proportions are not completely comparable to A4 paper. However, the templates for FN and PP booklets might work. If you do get it to work, please let me know =)
[youtube=http://www.youtube.com/watch?v=ZEssAIdOvto]
I also have a few pictures of the little passport I made.
I  made it last night after I came home from work and drove for 1.5 hrs through a whole lot of snow....
It's so much fun to make these.
Definitely feel like everything is coming together.
I can take everything I've learned in the past years...
And pour it into these notebooks =)
This little passport traveler will go up in my shop soon and  if you want to make your own booklets, I have several templates freely available. I also sell templates through my Etsy shop, as instant downloads. Please remember, there's a difference between the A6/FN/PP templates for A5 printing and those that are A4 printing, as I showed in the video. If you want a specific template, but can't find it, you can always drop me a line and I will try to make it together with you and for you. I hope you enjoy making your booklets. If you have any questions, please don't hesitate to ask. I will do my best to answer all. Have a wonderful day.

Continue reading

The making of a leather "Journey" Travelers's Notebook...

December 13, 2014 14 Comments

And the mess it creates. A while back I got a request for an A5 Traveler's Notebook by a lovely lady. Who made the mistake of giving me free reign in making it. Luckily she loves to create art as well. With that in mind and the fact that she planned on using it as an art journal I figured I could play a little. I first tested the idea on a Traveler's Notebook I felt I ruined with some wrong stamping... I couldn't make it worse, right. It turned out great, better even then expected.... and it left my whole Kitchen counter looking like a disaster area. I don't have a special art room and since I, obviously, was to enthusiastic and eager to try it, I didn't take any precautions. Which I should have, because I sprayed the leather dye... and I have sprayed inks before, so I should have known.
I did take some pictures while making this, so I'll try and explain what I did, should you want to try this at home. Please remember the leather dyes I use (and are suitable to do this) are permanent inks. It will create a mess, so please protect the surroundings of your project... thoroughly! I started with pouring the leather dye into a spray can and placed the TN in a box to keep the spray from spreading. Notice the papers in front of the box...those are needed as well!
I masked the word with some letters I had and several templates. The corners were masked with some torn paper kitchen towels.  In some places I moved the templates to a different spot after spraying and rubbed the dye into the gaps. The light brown color is the natural undyed leather color. I removed the letters with some tweezers, because they were too small to pick up by hand and I didn't want to get any dye onto the undyed parts.
I felt the natural color was a little too light, so I dyed the entire TN with the a yellow color.
To add some extra interest, I used several stamps in coffee color.
Which, I think, made it all come together.
Then for the standard finishing touches, I finished the edges with an edge slicker to make them nice, smooth and shiny.
Brushed the inside with a suede brush, as I do with all my TN's, because I like a soft inside. Sprayed some suede conditioner on the inside and oiled the outside. Added some elastics and booklets and the TN was ready for use. That was easy right? And this time only the inside of the box looked like the dye exploded. Here's the finished Traveler's Notebook with inserts.
With some extra elastic in the little envelope.
And a few A5 inserts I made.
It's ready for use...
As an art journal, or anything else she would like to use it for.
Almost forgot to mention, I also darkened the edges of the TN with the same coffee ink I used for the stamps.
To give it a more vintage used look.
I feel the edging makes it come to life. and gives it just that little extra ;-) I hope you enjoyed this and maybe even try it at home. Remember I cannot be held responsible for any mess you make when trying this... did I say it is permanent ink... because it is ;-) Have fun trying this and if you do, please let me know the result. Have a lovely weekend.

Continue reading

Double threading elastic for your Traveler's Notebook

October 04, 2014 2 Comments

Since I started making Traveler's Notebooks I have tried out several different ways to thread the elastic through the spine to keep the notebooks inside.

Obviously I started with the normal method, which is one thread, this is realy plenty to keep the notebooks in place.


However I got so many requests to put two elastics in the spine, that I started trying out different ways to thread the elastic. I looked around for ways other people were threading their Traveler's Notebooks and found several, but none of them really appealed to me. 

The first and easiest way I found would be the sideways threading, as opposed to the regular vertical threading. This seems very nice in the beginning, but has a tendency to deform the spine, so that wasn't going to work for me.

I also like to use the little tin clasp, since it performs two functions. It not only keeps the elastic for the spine, but it also holds the bookmark, keeping the amount of knots needed to attach everything to a minimum.

Threading two elastics and the bookmark through the little tin clasp is a challenge, since it is so small. You'd have to fiddle it through, tie a knot and then squeeze it closed. Plus I had a terrible time keeping the elstics nicely lined up, major OCD kicking in...yeah, that didn't work out too great. At least not the way I like it.

So I came up with an alternative threading, where I thread one long elastic through the spine twice, attach the waxed cord for the bookmark, keep everything lined up nicely and still easily use the tin claps to secure it all.


You start with keeping a length of elastic on the side, long enough to go from the bottom to the top.


Thread the rest through the second hole from the back to the front and up through the next hole, back to the outside.


Go over the top and pull the elastic into the slit at the top. Come all the way down and pull it through the slit on de bottom, to the back.

If your's doesn't have a slit, you'll have to thread it through the holes, from the outside to the inside at the top hole and the reverse at the bottom hole.

Now you flip it over to put the elastic through the second hole from the bottom. To aid me in pulling the elastic through the hole I use a wire folded in half, kinda like a hair pin.


As you can see, it goes through the same hole we started with, the loose end is still there.


From the inside it looks like this after you've pulled it through. Next step is to pull it through the second hole from the top, not the far top hole. From the inside to the outside.


Now all you have to do is to pull the loose elastic, which we left at the beginning, up through the bottom hole slit, up and around to the back, through the top hole slit.

In case you don't use the tin clasp, you can just pull the top elastic to the inside and the bottom one as well. You can then tie a knot in them on the inside and be done. You'll also have to tie your waxed cord for the bookmark to one of the elastics.


At the top on the outside you now have two bits of elastic. You can put each elastic through one of the holes on the underside of the tin clasp (there are 2 on the underside and 1 at the top).

Take the waxed cord and pull through the hole next to the top elastic, using the same folded wire (or anything else that's strong enough)


 You now have something that looks like this.

Take the top elastic and the waxed cord in one hand, the bottom elastic in the other and tie a knot.


Nice and tight,... but not too tight. You want the elastics to be firm enough to hold your booklets, but not so firm that they will tear your booklets.

The waxed cord sticking out is probably too long at this point and since we don't want to waste any, you pull it as short as you can. By doing this, usualy, the little knot disappears into the tin clasp. If it doesn't, pull the elastics on the inside to get the knot safely lodged inside the tin clasp. Remember to pull them all together.


When the knot is sunken well into the clasp, close the clasp by either tapping it with a hammer, or squeeze it with pliers, like I ususaly do.

I use a little scrap piece of leather to keep the clasp from getting scarred by the pliers. You don't need to do that, I just prefer it this way. It not only protects the clasp, but also the leather from getting scratched by the tools. Which is another reason why I prefer not to use a hammer.

This piece of leather will last you a long time. It has been my aid since I first started using the tin clasps almost a year ago now. Closing the clasp doesn't need a lot of pressure, but be sure to squeeze it nice and tight.


You can now cut the bits sticking out, right next to the clasp. Pull the waxed cord to the front, if you haven't already and cut it to size. Don't cut it too short, because you may want to tie some dangly things from it =)

All you need now is an elastic to keep your Traveler's notebook closed and you're good to go...well and some inserts of course...


I hope this has been helpful. Should you have any questions about any of this, please don't hesitate to ask.

I wish you a wonderful weekend.

Continue reading

How to add extra booklets to a Traveler's Notebook

September 24, 2014 6 Comments

I received several questions about how to add extra booklets to your traveler's notebook and since this is rather difficult to explain with just words, I thought I'd make a blogpost about it with pictures to make it easier to see.

As an example I used my Fieldnotes/Pocket sized Traveler's Notebook, with just one elastic (1 long and 1 short)


I took it completely apart, to show you how I add the notebooks to my TN and took lots of pictures...

When full it looks like this.


With a zipper file around the first booklet


A file folder with pen-loops around the second.


And lastly just a plain booklet.


Normally a Traveler's Notebook comes with 1 long and 1 short elastic down the middle. You can use the long elastic to insert one booklet and maybe the shorter one to inserts another.


I want to insert 3 booklets, a fie folder with pen-loops and a passport sized Midori zipper file 


For this you take the two booklets you want on the outside and, in this case, fold the zipper file around the booklet you want it. You can add the zipper file any way you like, but this is how I have it in this TN.


Open the booklets in the middle and put them back to front. Take an extra elastic, either the Midori type elastics or a thin, knotted, elastic cord (which is what I use) and slide it over the back of the first and the front of the last booklet. Effectively pairing the booklets into a set.


Then take one of the booklets and slide it under the long elastic in the TN.


Pulling it all the way trhough, so that each booklet sits on either side of the long elastic.


Take the remaining booklet, fold the file folder, with the pen-loops, around it and slide it under the long elastic in the middle of the two other booklets.


You could also do this first and then slide the set of two booklets over this one, but by doing it the way I showed, the two outer booklets will sit more securely within the cover.


Both ways work though and some prefer the outer booklets to slide over.


The result will look something like this. You can take the bookmark and place it in your booklet.


Since my TN's have a slit at the top and bottom hole, I always tuck the bookmark between the bottom slit, thus securing the booklets even further.


You could also piggy back a booklet onto the spine of another, like with the file folder, but that would split this booklet in half and it will push the first booklet out in front. If this is not a problem for you, then this is another way to add more booklets.


Also If you like to have 4 (or more) booklets onto 1 elastic, you can repeat the pairing of the booklets any number of times. You can also Pair two sets of two by adding a third elastic through the middle of the sets and slide one whole set underneath the long notebook elastic as you would with one notebook of just the single set. This way you'll have a set of two notebooks on each side of the long notebook elastic.

You can go even further and attach notebooks with extra elastics to the other notebooks.

By increasing the numer of booklets in the TN, you will increase the width of the spine, which decreases the width of the cover and it will increase the weight of the Traveler's Notebook. =)

I make all my TN's with 2 long and 2 short elastics, so you can repeat this procedure on the other elastic in any combination you like. (In another blogpost I will show you how to add the elastics and bookmark to your cover.)

You should also remember that by using your inserts, they will get thicker, sometimes twice (or more) as thick. When you use your TN, bits and bobs will get tucked in, kept in the file folder or in the zipper file, these all add to the thickness of the TN, making it increasingly difficult to write in. So you may want to stick to 3 booklets, it might not seem a lot at first...but just wait and see, it'll fill up in no time =)


So yes, as the little card says, thanks for being lovely and I hope you enjoyed this. Should you have any questions, please don't hesitate to ask.

Have a lovely week.

Continue reading

Mir Ardhon helped me make a file folder

September 22, 2014 4 Comments

I promised a long time ago I would make a video about how to make a file folder for your Traveler's Notebook. Since the video isn't realy coming along I thought a photo tutorial would be just as helpful.

So I set out make a file folder with the Traveling Dori, Mir Arhon watching my every move.


I'll do my best to keep the instructions short and clear.

This is a folder for a Regular sized TN, but this can be adjusted to any size you need.


You'll need 2 sheets of cardstock (or a file folder in my case) in the height you want. Since this is RS that would be 210 mm.
From 1 sheet you'll cut 2 pieces in the with of your insert (110 mm for RS)


You score 1/2" from the bottom and 1/2" from the side on each piece, making sure you score them oppositely.


Then you will cut off the two corners of the non scored side... also mirrored for both pieces.


To make the slit for the card slot, you place the scored side against the edge and the bottom at 3" (this goes for all sizes, as this will mark the height of you card slot). You slice through the card in the middle, making sure you make it approximately wide enough, but it doesn't have to be exact, since we will use this just as a guide later.


Just make sure it isn't too wide


Any rough edges can either be sanded down or sliced off with a sharp knife. I like making curly bits, so I slice them off.


Cut or slice the corners of the parts you are going to fold over.


Round the remaining corners, yes also those tiny ones...or you could just sand those down.


Fold on your score lines, making sure to reinforce those very well, this will make it easier later.


For the card slots you make two holes on the witdh you need for your card.


I use a big bite for this. Depending on the size you are making you should make sure it is wide enough.


Take your ruler and sharp knife and carefully slice from hole to hole to make the slot.


For the back of the folder, you take the other piece of cardstock and score the width of your insert, skip a bit and score again.


Measure the correct width and slice off the remainder.


Now you are left with this


Take the glue and generously apply it to the folds.


Place your File folder underneath something heavy and let it dry.


If you want, you can add pen loops to the folder.


Measure the with of the pen you want to use and mark that.


Glue the piece to your folder, making sure left and right side are on the same height.


Place it under something heavy to dry completely.


And you will end up with something like this


You can use it in your Taveler's notebook or any other purpose you might find for it.

After this Mir Ardhon and I felt a little hungry, so we enjoyed a cup of soup together =)


and did some reading with wind and rain outside, nice and cosy inside. Look at the color of that fall leaf.


I hope my instructions were clear. Should you have any questions, please don't hesitate to ask.
Have fun making your file folder and I wish you a wonderful week.

Continue reading

Menu

  • Home
  • Original Leather
  • Peregrine leather
  • Customize your Notebook
  • Inserts
  • Leather Pen Case
  • Small Leather Goods
  • Bags and Satchels

info

  • FAQ
  • How to order
  • Order Status
  • Workshops
  • Gallery

Contact

  • Contact us
  • About us

News & Updates

Sign up to get the latest on sales, new releases and more…

Country

  • Afghanistan (AFN ؋)
  • Åland Islands (EUR €)
  • Albania (ALL L)
  • Algeria (DZD د.ج)
  • Andorra (EUR €)
  • Angola (EUR €)
  • Anguilla (XCD $)
  • Antigua & Barbuda (XCD $)
  • Argentina (EUR €)
  • Armenia (AMD դր.)
  • Aruba (AWG ƒ)
  • Ascension Island (SHP £)
  • Australia (AUD $)
  • Austria (EUR €)
  • Azerbaijan (AZN ₼)
  • Bahamas (BSD $)
  • Bahrain (EUR €)
  • Bangladesh (BDT ৳)
  • Barbados (BBD $)
  • Belarus (EUR €)
  • Belgium (EUR €)
  • Belize (BZD $)
  • Benin (XOF Fr)
  • Bermuda (USD $)
  • Bhutan (EUR €)
  • Bolivia (BOB Bs.)
  • Bosnia & Herzegovina (BAM КМ)
  • Botswana (BWP P)
  • Brazil (EUR €)
  • British Indian Ocean Territory (USD $)
  • British Virgin Islands (USD $)
  • Brunei (BND $)
  • Bulgaria (BGN лв.)
  • Burkina Faso (XOF Fr)
  • Burundi (BIF Fr)
  • Cambodia (KHR ៛)
  • Cameroon (XAF CFA)
  • Canada (CAD $)
  • Cape Verde (CVE $)
  • Caribbean Netherlands (USD $)
  • Cayman Islands (KYD $)
  • Central African Republic (XAF CFA)
  • Chad (XAF CFA)
  • Chile (EUR €)
  • China (CNY ¥)
  • Christmas Island (AUD $)
  • Cocos (Keeling) Islands (AUD $)
  • Colombia (EUR €)
  • Comoros (KMF Fr)
  • Congo - Brazzaville (XAF CFA)
  • Congo - Kinshasa (CDF Fr)
  • Cook Islands (NZD $)
  • Costa Rica (CRC ₡)
  • Côte d’Ivoire (XOF Fr)
  • Croatia (EUR €)
  • Curaçao (ANG ƒ)
  • Cyprus (EUR €)
  • Czechia (CZK Kč)
  • Denmark (DKK kr.)
  • Djibouti (DJF Fdj)
  • Dominica (XCD $)
  • Dominican Republic (DOP $)
  • Ecuador (USD $)
  • Egypt (EGP ج.م)
  • El Salvador (USD $)
  • Equatorial Guinea (XAF CFA)
  • Eritrea (EUR €)
  • Estonia (EUR €)
  • Eswatini (EUR €)
  • Ethiopia (ETB Br)
  • Falkland Islands (FKP £)
  • Faroe Islands (DKK kr.)
  • Fiji (FJD $)
  • Finland (EUR €)
  • France (EUR €)
  • French Guiana (EUR €)
  • French Polynesia (XPF Fr)
  • French Southern Territories (EUR €)
  • Gabon (XOF Fr)
  • Gambia (GMD D)
  • Georgia (EUR €)
  • Germany (EUR €)
  • Ghana (EUR €)
  • Gibraltar (GBP £)
  • Greece (EUR €)
  • Greenland (DKK kr.)
  • Grenada (XCD $)
  • Guadeloupe (EUR €)
  • Guatemala (GTQ Q)
  • Guernsey (GBP £)
  • Guinea (GNF Fr)
  • Guinea-Bissau (XOF Fr)
  • Guyana (GYD $)
  • Haiti (EUR €)
  • Honduras (HNL L)
  • Hong Kong SAR (HKD $)
  • Hungary (HUF Ft)
  • Iceland (ISK kr)
  • India (INR ₹)
  • Indonesia (IDR Rp)
  • Iraq (EUR €)
  • Ireland (EUR €)
  • Isle of Man (GBP £)
  • Israel (ILS ₪)
  • Italy (EUR €)
  • Jamaica (JMD $)
  • Japan (JPY ¥)
  • Jersey (EUR €)
  • Jordan (EUR €)
  • Kazakhstan (KZT ₸)
  • Kenya (KES KSh)
  • Kiribati (EUR €)
  • Kosovo (EUR €)
  • Kuwait (EUR €)
  • Kyrgyzstan (KGS som)
  • Laos (LAK ₭)
  • Latvia (EUR €)
  • Lebanon (LBP ل.ل)
  • Lesotho (EUR €)
  • Liberia (EUR €)
  • Libya (EUR €)
  • Liechtenstein (CHF CHF)
  • Lithuania (EUR €)
  • Luxembourg (EUR €)
  • Macao SAR (MOP P)
  • Madagascar (EUR €)
  • Malawi (MWK MK)
  • Malaysia (MYR RM)
  • Maldives (MVR MVR)
  • Mali (XOF Fr)
  • Malta (EUR €)
  • Martinique (EUR €)
  • Mauritania (EUR €)
  • Mauritius (MUR ₨)
  • Mayotte (EUR €)
  • Mexico (EUR €)
  • Moldova (MDL L)
  • Monaco (EUR €)
  • Mongolia (MNT ₮)
  • Montenegro (EUR €)
  • Montserrat (XCD $)
  • Morocco (MAD د.م.)
  • Mozambique (EUR €)
  • Myanmar (Burma) (MMK K)
  • Namibia (EUR €)
  • Nauru (AUD $)
  • Nepal (NPR Rs.)
  • Netherlands (EUR €)
  • New Caledonia (XPF Fr)
  • New Zealand (NZD $)
  • Nicaragua (NIO C$)
  • Niger (XOF Fr)
  • Nigeria (NGN ₦)
  • Niue (NZD $)
  • Norfolk Island (AUD $)
  • North Macedonia (MKD ден)
  • Norway (EUR €)
  • Oman (EUR €)
  • Pakistan (PKR ₨)
  • Palestinian Territories (ILS ₪)
  • Panama (USD $)
  • Papua New Guinea (PGK K)
  • Paraguay (PYG ₲)
  • Peru (PEN S/)
  • Philippines (PHP ₱)
  • Pitcairn Islands (NZD $)
  • Poland (PLN zł)
  • Portugal (EUR €)
  • Qatar (QAR ر.ق)
  • Réunion (EUR €)
  • Romania (RON Lei)
  • Russia (EUR €)
  • Rwanda (RWF FRw)
  • Samoa (WST T)
  • San Marino (EUR €)
  • São Tomé & Príncipe (STD Db)
  • Saudi Arabia (SAR ر.س)
  • Senegal (XOF Fr)
  • Serbia (RSD РСД)
  • Seychelles (EUR €)
  • Sierra Leone (SLL Le)
  • Singapore (SGD $)
  • Sint Maarten (ANG ƒ)
  • Slovakia (EUR €)
  • Slovenia (EUR €)
  • Solomon Islands (SBD $)
  • Somalia (EUR €)
  • South Africa (EUR €)
  • South Georgia & South Sandwich Islands (GBP £)
  • South Korea (KRW ₩)
  • South Sudan (EUR €)
  • Spain (EUR €)
  • Sri Lanka (LKR ₨)
  • St. Barthélemy (EUR €)
  • St. Helena (SHP £)
  • St. Kitts & Nevis (XCD $)
  • St. Lucia (XCD $)
  • St. Martin (EUR €)
  • St. Pierre & Miquelon (EUR €)
  • St. Vincent & Grenadines (XCD $)
  • Sudan (EUR €)
  • Suriname (EUR €)
  • Svalbard & Jan Mayen (EUR €)
  • Sweden (SEK kr)
  • Switzerland (CHF CHF)
  • Taiwan (TWD $)
  • Tajikistan (TJS ЅМ)
  • Tanzania (TZS Sh)
  • Thailand (THB ฿)
  • Timor-Leste (USD $)
  • Togo (XOF Fr)
  • Tokelau (NZD $)
  • Tonga (TOP T$)
  • Trinidad & Tobago (TTD $)
  • Tristan da Cunha (GBP £)
  • Tunisia (EUR €)
  • Türkiye (EUR €)
  • Turkmenistan (EUR €)
  • Turks & Caicos Islands (USD $)
  • Tuvalu (AUD $)
  • U.S. Outlying Islands (USD $)
  • Uganda (UGX USh)
  • Ukraine (UAH ₴)
  • United Arab Emirates (AED د.إ)
  • United Kingdom (GBP £)
  • United States (USD $)
  • Uruguay (UYU $U)
  • Uzbekistan (UZS so'm)
  • Vanuatu (VUV Vt)
  • Vatican City (EUR €)
  • Venezuela (USD $)
  • Vietnam (VND ₫)
  • Wallis & Futuna (XPF Fr)
  • Western Sahara (MAD د.م.)
  • Yemen (YER ﷼)
  • Zambia (EUR €)
  • Zimbabwe (USD $)
American Express Apple Pay Bancontact Google Pay iDEAL Maestro Mastercard PayPal Shop Pay Union Pay Visa

© 2025 Falcon Travelers. Powered by Shopify